Connecting headlights through a relay
If you need to connect additional headlights or remove the load from the main light sources, a relay is used. It is easiest to put a four-pin version, as you can buy it at any auto store, it is inexpensive and easy to install. The main thing - to understand the specifics of work and correctly connect the wires to ensure proper operation of the equipment.
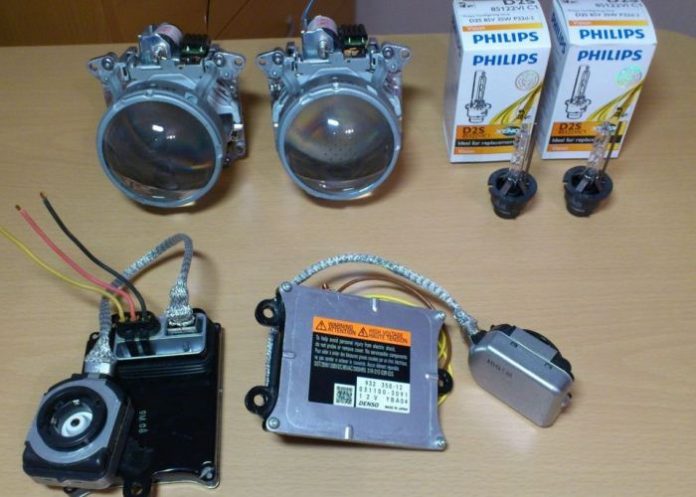
What you need to connect the headlights
To begin with, you should prepare everything you need. Usually the same set is used:
- New headlights with mounts, so that you can put on the car when connecting and fix it securely.
- Relay to connect the light. The easiest thing to use is a standard four-pin version with connectors numbered 85, 86, 87 and 30. They are sold in auto stores and are used for fog lights, as well as any other light source.
![Connecting Headlights via Relay]() The basic elements for connecting the lights.
The basic elements for connecting the lights. - Fuse in a special case for installation near the battery, rated at 15A (or more, depending on the characteristics of the equipment).
- Button to turn the light on and off. Either the regular version is used, or an additional version to be installed in a suitable place in the interior of the car.
- Wires in the right quantity, sold in stores. The cross section will tell you based on what headlights will be connected.
- You will also need connectors, heat shrink, screwdrivers and other tools.

You can also place the fuse in the original fuse box, there is usually room. But this will complicate the work, as you will have to pull the wiring to the block separately.
Wiring diagram of auxiliary headlights via relay
First of all, you need to study the scheme of connection of headlights through a relay, shown below. This is the order in which the wires must be led, you can not mix up anything, because the light will not work.

In the video, the connection of additional headlights is very simply explained.
Preparing
Since the auxiliary lights are most often switched on together with lights, you need to think about where it is best to connect to the on-board network. Panel illumination or any other convenient point is suitable. This will eliminate the inclusion of headlights without lights, which is important according to Traffic rules..
You should also choose a place for the relay. Here we must proceed from the convenience, as well as to ensure reliable mounting. The relay must not get wet. It is most often placed under the instrument panel in the cabin or in the protected part of the engine compartment.

It is necessary to think in advance, where and how the wires will be laid. They should not stick out or hang in plain sight. It is better to attach them to the regular wiring and pull through so as to avoid damage during the operation of the car.
Work
To connect the light through a relay, it is easiest to divide the process into separate steps and perform them in order:
- Connects the power wire in the selected location. It is important to ensure reliable contact and protect the connection point, to do this, use a ready-made terminal.
- Power is pulled to the light switch. Here you will need a diagram or you can find the right contacts experimentally, as the design may vary from model to model.
- From the button pulls the wire to contact 85 of the relay. It is optimal to connect it through the socket, which can be bought in the kit. Then the connection will be reliable and strong.
![Connecting headlights via relay]() Relay pin designation.
Relay pin designation. - Pin 87 is connected next and a wire should be routed from it to the battery power. A fuse is cut into it, it is desirable to put this element as close to the battery as possible.
- Contact 86 can be led to the car body and fastened, ensure a good connection to the metal. And ideally pull the wire to the minus terminal of the battery, if it is not too difficult.
- As for the auxiliary headlights, most often there are two contacts. The minus one should be fixed to the car body or to the negative terminal of the battery, there is not much difference. The plus is connected to contact 30, you can pull two wires or connect them next to the headlights and lead a single wire.

Video on the subject: What is the additional relay.
Wiring mistakes
To avoid problems, you need to consider the basic mistakes and avoid them:
- Poor connection contact. You should not make twists and wrap them with duct tape, this is not a long-lasting option.
![Connecting headlights via relay]() You should connect the wires to the relay through a connector to ensure reliable contact.
You should connect the wires to the relay through a connector to ensure reliable contact. - Installation of the relay in the wrong place. If it is loose and exposed to humidity, it can fail quickly.
- Using thin wires. They will overload and become hot when running, which will eventually cause the insulation to melt. It is better to buy a version with a safety margin.
- Lack of a fuse in the system. In case of voltage fluctuations and short circuits, the headlights will fail or the wiring can catch fire.

It is not difficult to connect the headlights through a relay, as all the necessary things are sold in auto stores, and the circuit is very simple. The main thing is to ensure reliable contact connections and lay the wiring carefully so that it will not be damaged during operation.