Self installation of headlight lenses
Installing a lens in a headlight can also be done by yourself. But to do the work qualitatively, you should understand the process and follow the instructions. In addition, it is worth remembering that not all headlights are suitable for the installation of lenses. If this is not provided by the manufacturer, for such a conversion can be imposed a fine or even deprive you of your license for up to six months.
What you need to install
Before you start work, you should understand whether it is possible to use this option for the car and whether there will be no problems with the law. Therefore, you need to consider several important aspects:
- Whether the headlights are suitable for the use of xenon light sources. Information about this is always in the marking on the body, so it is worth studying it. If the design is designed only for halogen bulbs, it is better not to work.
- What kind of glass is installed on the headlight. If it is the usual diffusing version, the light from the lens will not be distributed correctly. Smooth glass is best, it can be purchased separately, as you will still have to remove this element when working.
If different types of headlights were installed on the model, you can purchase a used version that fits the lenses and install them so you don't break the law.
Varieties of Lenses
Now you can find several options on sale, each of them has its own features:
- Halogen. In this case, each element is responsible only for dipped or high beam.
- Xenon .. The same option as the above. A separate lens is responsible for each type of light.
- Bi-halogen .. One unit works for both low and high beam, which makes it much preferable.
- Bixenon .. The most modern and powerful variety that provides perfect light quality. It works in two modes - dipped and high beam, which are switched due to the special shutters installed inside.

It is best to use bi-xenon light, as it is much easier to install a single lens, and the quality of light is superior to bi-halogen options.
Installation rules
Installing a lens in a headlight is a responsible and painstaking process. If there is no experience in such works and the necessary tools, it is better to entrust the work to professionals. But if you want to understand can everyone, if you spend a day, you can save money and get headlights with high-quality light.
Materials and tools
First of all, you need to buy a set of bixenon lenses. Usually it has everything you need to connect - wires, ignition units. It is important to choose options from proven manufacturers, which give quality light and normally adjustable. Saving on quality is not worth it. From the tools will need the following:
- Construction hair dryer to warm up the sealant on which the glass is glued. If you do not have it, you can do with an oven.
- A set of screwdrivers of various shapes and sizes. Different fasteners can be used for disassembly and assembly, so it is worth preparing in advance.
- Pliers, you can also stock up on 2-3 different sizes.
- Gloves to protect your hands.
- Sealant for gluing the headlight glass. It is better to choose a quality version.
- Additional fasteners may be needed in some headlamps.

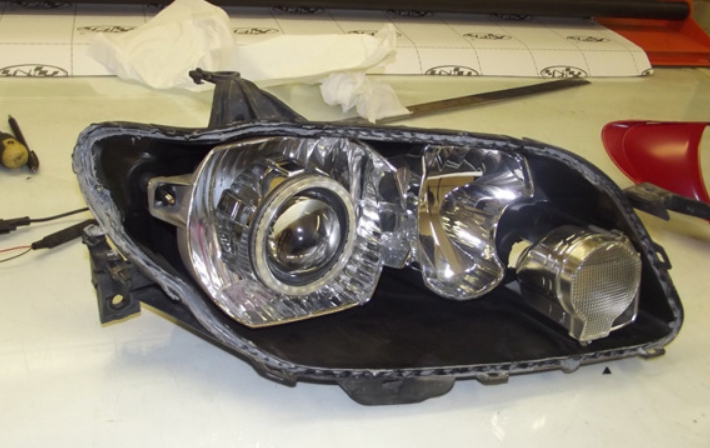
Headlight disassembly
When doing the work yourself, it is very important not to damage the headlights, because you will have to buy new ones. First of all, they need to be removed from the car, here it all depends on the model and the features of the body mounting, usually all the information is in the manual. Next, you need to follow the instructions:
- All plugs and bulbs are removed from the back. It is necessary to remove everything that can interfere with the disassembly.
- The glass is glued to a special sealant, to remove it, you need to heat the surface. To do this, it is best to use a construction hair dryer, heated joint, and then a trowel or other elements gradually separate the parts. When working, you must be careful and heat the joint in order, moving along the perimeter.
- If you do not have a hair dryer, you can put the headlight in an oven heated to 200 degrees for 5-10 minutes. The construction will not be damaged, but the sealant will become soft and you can separate it.
- After removing the glass, clean the remains of the adhesive from both surfaces, otherwise it will be difficult to glue the element back. To do this, you can use any type of tool. To simplify the work, the sealant can be heated with a hair dryer and removed with a wide screwdriver.
- The reflector is carefully removed from the mounts. It is important not to damage the headlight correction system, because with its help the lens light will be adjusted. It is worth studying the design to understand how to reassemble later.

Lens installation
Here you can either attach the lens to the correction system or cut a hole in the reflector for the element and fix the design that way. The second option is more often used because it looks more attractive. Here it is important to remember the following:
- The lens is best attached to metal rails, and the connection around the perimeter is treated with sealant to ensure strength and protection against moisture penetration.
- The reflector can be painted any color, such as making a dark background. It is not needed when using bi-xenon and plays only a decorative role.
![Do-it-yourself headlight lens installation]() Lenses on a dark background look spectacular.
Lenses on a dark background look spectacular. - After fixing the element, it is worth making sure that the system is corrected by the screws installed on the body. This will allow you to adjust the light later without any problems.
- Next, you need to put the glass in its place. To do this, the place of gluing is degreased and cleaned, glue is applied along the perimeter. It is necessary to follow the instructions to ensure reliable gluing.
- Headlights are placed on the car and fastened in the same way as before. Then you need to carefully insert the bulbs in the lenses and connect the connectors. It is important to find a suitable place for the ignition units. They are either placed in the headlight housing, if it is large, or mounted in the engine compartment, just put them not worth it. The wiring is connected according to the diagram.

After gluing the glass, you need to wait from two hours to a day, it all depends on the glue used. Information on this light is always on the package.
Video: Installation of LED lenses in a headlamp without special tools and devices.
Adjusting the lenses
To avoid dazzling drivers and ensure proper distribution of luminous flux, you need to adjust the headlights correctly. This requires a flat area in front of the wall. The work should be done as follows:
- Fit the car closely to the wall, mark its center and draw a vertical line. Make marks against the center of the lens on both sides. Make two more vertical lines in these places.
- Mark and draw a horizontal line 5 cm below the center of the lens.
- Move 7 meters away from the wall. Turn the light on and align the beams so that they are at the intersection of the horizontal and lateral verticals. Adjust with the screws on the body, it is important to bring the light out accurately.

Installation mistakes
To ensure a good light, it is important not to make typical mistakes. First, purchase cheap products with uneven light distribution that cannot be adjusted. Secondly, install the lens rigidly, in this case it will not be possible to correct its position.
Video lesson: The correct adjustment of headlights on the wall (without special equipment).
Put lenses in the headlights with your own hands is not as difficult as it seems. But it is important to do everything carefully and fix the elements so that their position is adjustable.