How to install and connect a motion sensor to turn on a light
The motion sensor is relatively inexpensive. You can buy it in specialized stores and online marketplaces, including the popular Aliexpress. Its cost will be repaid many times over if it is built into a system of automatic lighting control. The sensor will turn on the light only if there are objects in the controlled area (people, cars, etc.). Also, the motion detector can control surveillance cameras, alarms, etc. You can connect any motion sensor yourself.
Choosing the sensor model
The first step is to choose the type of sensor. Radiofrequency (microwave) are expensive. They are installed to control large areas (warehouses, parking lots, etc.). Given the harmfulness of electromagnetic radiation, ultrasonic and infrared sensors are used for domestic purposes and small-scale production. The first are more sensitive, more noise-resistant, but also more expensive. In addition, ultrasound can be heard by pets, and it can cause them discomfort (there is an unproven theory that ultrasound scares away small rodents and insects). For this reason, infrared sensors are used in homes and offices. In addition, they are cheaper. Other criteria for selecting a sensor:
- Range.. It should not be less than the distance to the farthest point of the monitored area. There is no reason to overpay for a longer range.
- Angle of control. Sensors of ceiling type in a horizontal plane control zone with an opening of 360 degrees. Wall sensors control 180 and less (due to their design). With wall sensors control of anti-vandal zone (below the sensor) is desirable - there from intruders can disable the device.
- Switchable power. If it is not enough to control the existing load, you will have to put repeater relays.
- Supply voltage. If it differs from 220 volts, you will have to arrange additional power sources.
- Protection rating. Must ensure that the device will work in the selected location - indoors or outdoors.
| Motion detector | Operating principle | Range, m |
| Smartbuy ceiling | IR | 6 |
| REXANT DDS 03 11-9211 | IR | 12 |
| REXANT 11-9215 | IR | 9 |
| REXANT DDPM 02 11-9217 | RF | 10 |
| TDM DDM-01 SQ0324-0015 | RF | 8 |
There are also other characteristics for selecting a sensor (color, power consumption, release time, etc.), but they are not of fundamental importance for connection and installation.
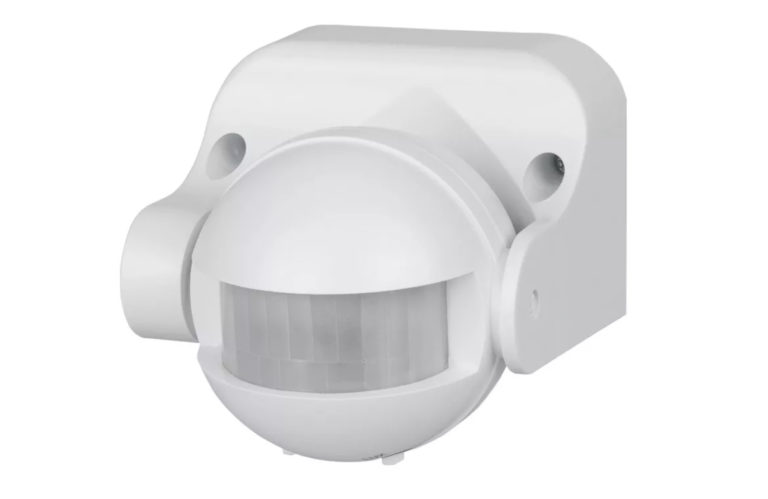
Choosing where to install the detector
First of all, the sensor must be installed so that it "sees" the monitored area. The viewing angle in the horizontal plane must cover the territory from where the object can appear. If the sensor does not cover the entire area, you will have to install two or more units. For information about the angle of opening in both planes, refer to the manual of the instrument. There you can also find out the optimum mounting height of the detector.


Selecting the mounting height and viewing angle it is necessary to find such a position for the sensor to be sure when a person appears and not to react to small animals. Otherwise, false alarms (or no alarms) can not be avoided.
Installing a sensor in an apartment
In an apartment motion detectors are used in two categories:
- with a temporary stay of people (hallway, part of the stairwell) - where it is necessary to turn on the light for a short time;
- with a permanent stay of a person (kitchen, living rooms, bathroom).
In the first case, everything is simple enough. The sensor is connected according to the selected standard scheme - from those discussed below. In this case, in addition to saving electricity, additional convenience is achieved - the light for the entering person turns on without the help of hands. After a period of time (to be selected during setting) the light is switched off.
In the second case, such a scheme is inconvenient. If you enter the kitchen and sit without moving, the light will soon go out. You will have to periodically activate the detector by making movements. This is inconvenient, so it is better to provide a three-position switch that allows you to put the automatics out of operation by forcing the lights on.

The problem is the aesthetic component. Three-position switches that can blend into the interior are difficult to acquire. The decision to use this circuit is up to the owner of the room. The wiring process in this case is not much different from a conventional installation. It is necessary to find a place to install the three-position switching element, bring the phase wire from the distribution box to it. From it take two wires to the place where the sensor is installed, and connect both wires according to the diagram.
Marking of sensor terminals
There are two basic types of sensor designs With two terminals for connection or with three. There is no standard for the marking of terminals, and each manufacturer is free to introduce its own marking system. But in most cases for two-output sensors the outputs are marked:
- L - for connection of the 220 volt phase wire;
- L1 - to connect the wire to the load (Out or arrow pointing outward, etc. are possible).
For three-wire models, the terminals are labeled:
- L - to connect the 220 volt phase wire;
- N - this terminal should be connected to the neutral wire;
- A - output for load control (Out or arrow pointing outward, etc. is possible).

Connection options for different modifications are described below.
Wiring options for the detector
The basic wiring diagram of the sensor motion detector is not complicated. If you remember that the motion sensor is a light switch that works automatically, it is not difficult to deal with the installation. But, unlike a simple switch, the motion detector needs to power the internal circuitry. And this problem is solved differently by developers, hence a certain difference between the connection of devices of different modifications.
Two-wire circuit
Such a sensor is included in the gap of the power circuit of the lamps. The form-factor of many detectors is the same as the design of household light switches, so they can be put in the same installation boxes. This option requires virtually no modifications to existing household wiring.

Important! To ensure proper operation of the sensor, it must be connected in the phase wire gap. This must be checked before starting the installation.
Three Wire Circuit
Other models require a neutral wire connection for normal operation.

In most cases, this connection inside the house or apartment will require changing the wiring, cutting through the walls, etc.
Connecting a three-wire sensor in a two-wire version
Those who do not want to start a major renovation only in order to install a motion sensor to automatically turn on the light, in some cases, the following scheme can help.

In this case, the light must be shunted by a capacitor with a capacity of 2.2 μF and designed for a voltage of at least 400 volts. It has a small resistance to AC current, so the N terminal of the device will be permanently connected to the neutral conductor of the mains. The capacitor can be installed directly on the lamp holder terminals. A diode must be connected to the control output, through which the bulb is switched. The semiconductor device must be designed for a reverse voltage of at least 350 volts and the full operating current of the lamp. This option is not always workable. For example, such a scheme is not applicable when using LED lighting elements.
Scheme with a switch
You can supplement the lighting system with a household light switch. It will allow - regardless of the state of the sensor - to turn the light on or off (depending on the selected scheme).

Here, an additional switching element is included in the gap of the power supply wire and allows the power supply circuit to be interrupted even if the sensor is switched on.

To switch on the light independently of the motion detector, the switch must be connected in parallel to the output contact group of the motion detector. This can help if the device malfunctions.
Switch on the load via an intermediate relay
If the load capacity of the motion detector output is not enough for switching heavy lights, the problem can be solved by installing a repeater relay. A magnetic starter or a contactor can be used.

The maximum current of the intermediate relay must be sufficiently higher than the operating current of the light.
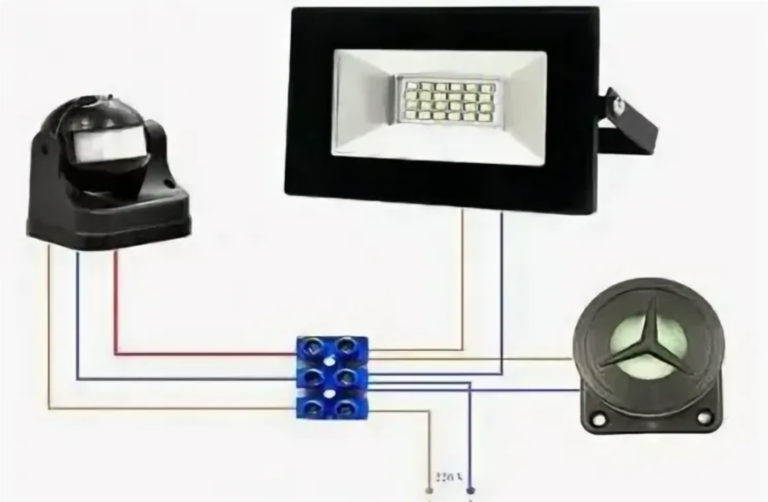
Connection of several sensors in parallel
There are situations where lights can be controlled from several locations. Such a need arises, for example, when it is necessary to automate the switching of lights in a corridor or a long staircase and the "range" of one detector is not enough, or when the corridor has a turn. In this case the output contact groups of the sensors are connected in parallel.

If at least one of the sensors does not allow for the connection of a full lighting load, a repeater relay will need to be used.
This video describes the three ways of connecting the sensors in an easy to understand way.
Typical installation and wiring mistakes
When performing electrical wiring, care must be taken to ensure phasing. The sensor must break the phase wire. Check this with an indicator screwdriver. For safety reasons, it is absolutely necessary to de-energize the workplace afterwards.
Near the place of installation of the infrared sensor there should be no objects with contrasting, in relation to the environment, temperature - heating batteries, incandescent lamps, etc. It is also necessary to exclude the penetration of warm air jets from heating elements and air conditioning systems. If the detector is installed outdoors, there must not be any smoke pipes in its field of view.
Do not confuse detectors with ceiling and wall mounting. They have a different field of view. With the wrong choice, problems will inevitably arise.
If the motion detector is used as part of a security system and works in the daytime, false alarms can occur if there are large metal structures (fences, decking, etc.) in the sensor's field of view. Heating up in the sun, the metal can make the sensor give false signals.
If possible, protect the sensor lens from getting dirt on it - this will reduce the sensitivity .. If you can not install the motion detector with the exception of dirt, it is necessary to ensure regular inspection and cleaning of the detector.
Video lesson: 5 mistakes when installing the Ajax MotionProtect Outdoor motion detector
If these uncomplicated requirements are met, the sensor will last a long time and save significant amounts of money on lighting.