How to properly disassemble a light bulb
After an incandescent bulb burns out, most people immediately throw it away. But do not rush to do this: some parts can be useful. First, you should learn how to disassemble a light bulb. You will need several tools - tweezers, screwdriver, pliers and pliers.
You will also need tight rubber gloves, as there is always a risk of cutting your hands when working with glass. The burned-out bulb after disassembly can be used to create decorations, such as garland, panel or lampshade.
How to open an incandescent bulb
From a burned-out incandescent bulb you can make an original container for condiments, a miniature aquarium or a florarium. If you do not yet have experience in disassembling such devices, it is recommended to start with a standard light bulb. Because there are no harmful substances inside it, as in the energy-saving one, the master does not risk his health.

The device device
Before opening the light bulb, it is necessary to study all the elements of the assembly:
- bulb;
- cap;
- pins;
- electrodes;
- holder for the tungsten filaments;
- insulating material;
- filament;
- socket contacts.

The bulb is made of ordinary glass. It serves to protect the tungsten filaments from the environment. Inside the bulb there is a pole with electrodes and filament holders. For the device to work, vacuum is created and special gas is pumped into the flask. Often it is argon, which is explained by its properties that do not allow the lamp to overheat.
On the side of the electrode outlet, the bulb is glued to the base. In addition, it is additionally soldered with glass. The aluminum base is needed for the lamp to be installed in the socket. The filament radiates light and is almost always made of tungsten.
Video: Detailed disassembly example
Disassembly process
Working with glass requires attention. The material is brittle at the stem level and rough at the insulator. To ensure that in the case of damage to the bulb splinters do not scatter on the sides, you should properly prepare the workplace. For this you will need a cardboard box. The bottom should be covered with a soft material.
Then you can proceed to the disassembly, following the following algorithm of actions:
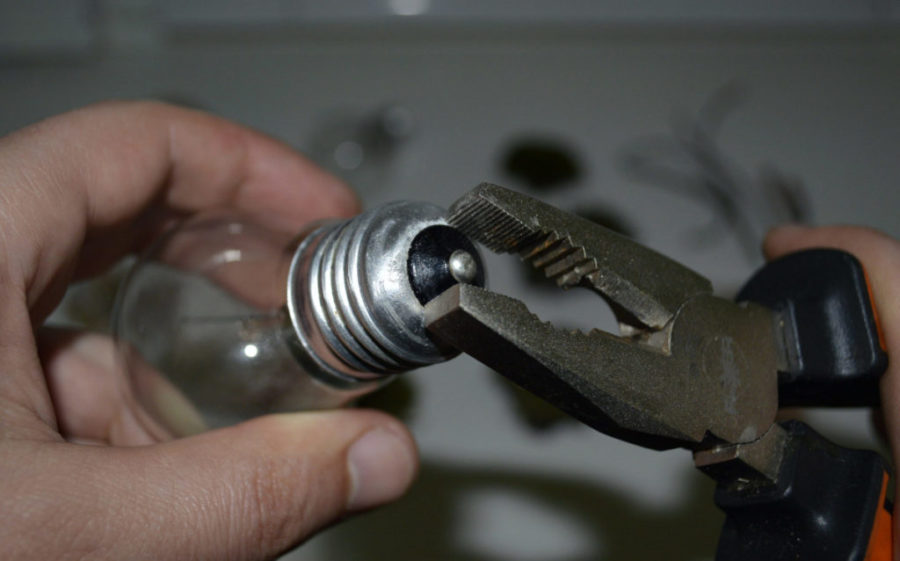
- The first stage of disassembly is the removal of the contact part, which is sealed at the neck of the flask. To do this, you will need thin pliers. To remove you need to loosen this part of the design, until the wires connected to the lamp base will not break. After the contact part can be removed.
- Next, you need to open the insulation of the base with the same tool. The foot of the lamp should be rocked and removed with the rest of the assembly.
- When the inside of the bulb is accessible, it should be wiped clean. The lamp without insides is used to create a mini greenhouse, in which you can grow miniature flowers.
- If you need to remove the base, you should first place the device in a mixture of hydrochloric acid for a day, as the connection is very strong. The substance will dissolve the glue, after which the plinth is easily detached from the bulb. Rubber gloves will be needed for this work. The lamp should also be rinsed well. If this method is not suitable, the elements can be disconnected with a glass cutter.

How to disassemble a lamp and socket correctly
The bulb replacement procedure does not always go without problems. Sometimes it accidentally separates from the socket. In this case, you will have to disassemble the socket. For the work, you should prepare rubber gloves and safety glasses. Next, it is necessary to turn off the electricity and check the absence of voltage with the help of an indicator.
Now the craftsman will need narrow pliers. They need to rotate the plinth counterclockwise to unscrew it from the chuck. If you cannot grasp the plinth, you should bend its edges inward. Sometimes this method does not work, for example, if the bulb has been screwed too tightly into the socket.

In this case, you can use the folk method. You will need a plastic bottle for this. Its neck should be heated until softened and screwed into the plinth. After 30 seconds, the plastic will harden and stick. If this option does not work, you can find a suitable tool, firmly press it against the walls of the plinth inside and try to turn it.

Is it possible to open the bulb without breaking it?
Since the base is attached to the glass it is very difficult to open the bulb without breaking it. If the bulb is old, the glue has already dried out and will crumble if you use pliers.
Another safe way is to use a screwdriver or knife to bend a part of the base at the junction with the glass and tear off one strip accurately. Next, the work will go easier. You need to crush the remaining glue and get rid of the remains of the base.
How to unscrew the lamp with WD-40
Safety precautions
In addition to tools for work, it is necessary to prepare personal protective equipment. First of all, these are rubber gloves, preferably thick. It is better to disassemble on a cardboard box, otherwise splinters can fly around.
Before disassembly you should carefully study the instructions. In order not to damage the flask, you should not make any sudden movements, because you will have to work with rough tools.
Also read: The 5 main causes of bulb burnout.
What you can use the lamp elements for
Most often they are used to make such crafts as:
- florarium for mini plants;
- miniature aquarium;
- flower vase;
- kerosene lamp;
- A container for storing paper clips or other small items.
Miniature Florarium
To make a bulb florarium for plants, you need to take out everything unnecessary from it and leave only the base and bulb. At the very bottom you can put beautiful stones. Next, the filler is placed, it can be forest moss. Sometimes earth and pieces of tree bark are added. If there are stones at the bottom, you can put sand on top of them.

Then you need to take the plant with tweezers and carefully insert it into the soil or sand. It is possible to close the bulb not only with the base. A cork cut from wood or an acorn cap will work for this. It is better to use a large incandescent bulb.
Inside the hermetically sealed bulb, oxygen production, consumption of carbon dioxide and water circulation takes place. There is no need to water the closed florarium. It is like a miniature planet with its own climate.
The open version requires moderate watering as the ground dries out. If you overwater, mold will appear. Mosses can be sprinkled occasionally. Just like on the ground, plants in a bulb will gradually grow and develop.
It will be useful to familiarize yourself with: Why bulbs explode.
Conclusion
To successfully disassemble the bulb and not to damage the bulb, it is advisable to use old devices in which the glue that connects the base with the glass has dried up. It is necessary to work with gloves, and wear safety glasses to protect your eyes from damage if the lamp accidentally bursts.