Step-by-step installation of rooftop solar panels
Using the sun's energy for electricity or water heating allows you to save on energy resources. In addition, independence from external utilities is provided, problems with the supply of electricity will not be feared. Installation of solar panels on the roof requires attention, as you need to calculate the number of modules and think about their correct location.

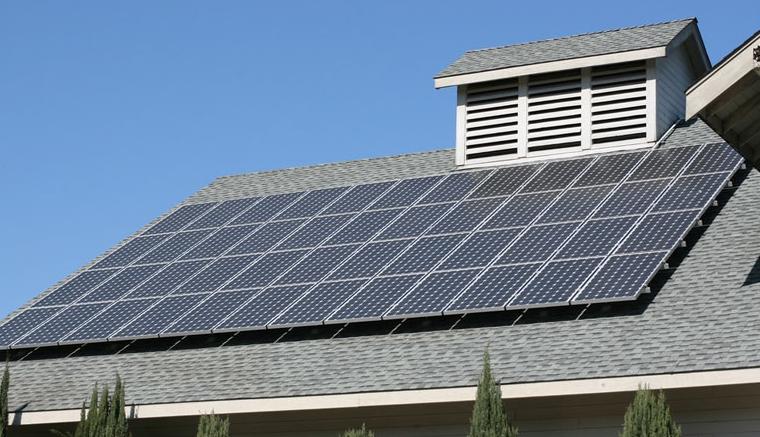
The advantages of installation on the roof
Panels can be placed not only on the roof, but also on the walls or on the ground. But the first option has gained the most popularity, as it has many significant advantages:
- Good location relative to the sun. The more sunlight that hits the surface of the batteries, the more energy they produce. The slope allows for greater efficiency, especially if it is located in a southerly direction.
- Little risk of damage and deterioration to the panels. Since they are on the roof, they can only be damaged by throwing a rock on purpose, any accidents are virtually eliminated. The elements are located at a small distance from the surface, even in strong winds there is no danger of tearing the mountings, as the sail is small, unlike systems that are placed on the ground.
- Everything you need for mounting is sold together with the solar panels. You do not need to invent fasteners and adapt improvised elements. There are brackets for different types of roofs that are not difficult to align and adjust the height. They last for decades, which is also important.
- Solar panels do not take up space on the site. Since the area of the modules is usually not small, a lot of space is lost when they are placed in the yard. Even if there is an attic floor on the roof, it is not a problem, in the location of the windows the panels are not attached and the natural light does not suffer.
An additional advantage of using solar panels can be considered an increase in the service life of the roof by one and a half to two times. Since most of the roof is covered by panels and they are exposed to the sun and precipitation, the roofing material under them almost does not deteriorate and retains its properties for decades.
Roof illumination at different times
To provide the house with off-grid electricity, you need to make accurate calculations and determine how many solar panels will be needed. It is necessary to take the average electricity consumption per day, and calculate the number of panels (it matters how much current they generate). In addition, it is worth considering a number of other aspects:

- Insolation - reflects how much solar radiation reaches the surface in different regions at different times of the year. It is calculated in kilowatt-hours per square meter per day. Depending on the location of the indicator varies, the scheme with the table below.
- To get the maximum amount of electricity, you need to install solar panels on slopes facing south, this rule is true for the entire northern hemisphere. The easiest way to find out the orientation of the house is to use a compass (download it to your smartphone), or you can look at your house on Google maps. If you can not place the structure exactly to the south, you can choose southeast or southwest, other options will not work.
- You have to take into account the time of year as well. In summer the sun is located high, and in winter low. To ensure the efficiency of the system, you need to choose the position of the panels, in which they will give the best effect throughout the year. You can use rotary mechanisms, but they are difficult to install and expensive, the increase in efficiency is often not worth the cost.
- The solar panels also receive different amounts of light during the day, so the energy is not stored evenly. You want as much sun as possible to reach the surface between 10 a.m. and 2 p.m. Ideally, the roof should be illuminated all day, even if not at an ideal angle.
- If there are trees and other objects nearby that can cast shade, you need to eliminate them. And if the house is shaded by high-rise buildings, there is no point in putting solar panels, because the effect of them will be minimal.

What fasteners will be needed
Mounting depends on the type of roof and roofing material. Choose a fastener is not difficult if you understand its features. There are few options, each has its own nuances:
- Installation of the panels themselves are made on special guides, which usually fit all types of fasteners. That is, this part of the design is always the same and does not depend on the type of roof and roofing material. To simplify the work and reduce the load on the roof rails are made of aluminum or aluminum-based alloys.
- The clamps that fix the panels are also always the same. They are fastened in the rail and due to the special shape leg presses the body to the surface. They can be divided into single-sided, which are placed at the edges and double-sided, used between the panels.
- Special connectors are made to connect the rails securely. Also, the design always has grounding terminals, which connect the entire frame into a common circuit and ground it.
![Step by step installation of solar panels on the roof]() Fasteners for solar panels on asphalt shingles.
Fasteners for solar panels on asphalt shingles. - For roofs where the connections are made in the form of rebates, as well as for any metal options with protrusions use fasteners that do not disturb the surface of the roof. Clamp is fixed to the ledge with a screw and due to this keeps the construction.
- For metal tile and corrugated board use fasteners that violate the integrity of the material. In this case, use special self-tapping screws for metal, for which it is desirable to drill holes. Ideally, hit the metal or wooden frame under the coating to ensure strength. To the place of attachment does not leak water, be sure to use washers with a rubber spacer.
- If the roof is a clay tile or other piece version, brackets are installed that go under the surface and do not damage the structure. Usually you need to remove the element, set the bracket so that it does not interfere with the laying of shingles in place. The same solutions are suitable for flat roofs, if possible, it is necessary not to damage it.
- For shingles use smaller versions, which also go under the surface. It is best to put them when installing roofing material. But even then you can unbend the individual pieces to install the fasteners and not to damage the roof.

Do not use homemade fasteners - if they spoil the panels, you will have to replace them at your own expense.
Mounting on a sloping roof with a different type of roof and using aluminum fasteners.
Installation - step by step instructions.
It is better to buy all accessories from one seller, when choosing from several take into account the data from the project, which is necessarily made before starting work. Usually calculations are done for free, it is better to entrust it to specialists. It is also worthwhile to contact the organization that supplies electricity in advance and obtain permission to install the system.

Carrying out the work of specialists on average costs about 100,000 rubles, if you handle it on your own, you can save a lot. The main thing is to do everything by simple instructions:
- Plan the location of the panels on the roof, here it all depends on the number and configuration of the slope. Think about the location of mounts, choose a convenient option according to the size of the solar panels. It is best to draw at least the simplest plan, so then do not get confused and know in what places to put mounts.
- Accurately determine the location and fix the brackets, here it all depends on the type of roof. Use any suitable fasteners, usually quick fixes, self-tapping screws on wood or special screws for metal roofing. Do not forget to check the distance and pitch of each part.
![Step-by-step installation of solar panels on the roof]() Special fasteners are inserted into the groove of the rail and clamped with a hexagon.
Special fasteners are inserted into the groove of the rail and clamped with a hexagon. - Align the guides. If the brackets are as they should be, then there are no problems with this step. Everything is done with standard fasteners, aligned on the level, this is the most important requirement. Due to the adjustable elements, you can change the position of the guides.
- To lay the wires. Use a quality cable that matches the characteristics, usually the data is in the project. Consider how to run it from the roof and lay it around the house to all the necessary nodes. If necessary, use a corrugated hose which will prevent fire in case of short-circuits. Do not forget about the grounding, make it according to the recommendations of the seller of the kit.
- Determine the location of the inverter with the charge controller. The closer it is to the batteries, the less electricity will be lost and the more efficient the system will work. Therefore, it is desirable to locate it in the attic, having equipped the space, for protection you can build a box. To make it more convenient to control the system, it should be equipped with a wireless connection module, then you can watch all the indicators via the Internet with a computer or smartphone.
- Equip the room with batteries, a fuse box, and a disconnect switch to disconnect from the mains if maintenance is needed. It must comply with safety standards, and it is best to lock the door if there are children in the house. The capacity of the batteries should be chosen according to the power consumption.
- Install solar panels on the roof, for this it is better to involve a couple of helpers, as the panels need to be carefully lifted and supported during fixing. Use regular fixings, each element should have at least 6 attachment points. Put in order so that the installed parts do not interfere with the installation of the following, do not forget to connect each panel after fixing.

Connect the system to the network should be an electrician, if you do it yourself - will write a fine.
There may be other features, it all depends on the design of the roof and the equipment used. It is better to consult with an expert, or to assign some of the particularly difficult work to professionals, so as not to spoil anything.
Video: Installation and wiring diagram.
Maintenance
You can do most of the work yourself, but it is desirable to involve a specialist at least once a year to check the condition of the equipment and, if necessary, carry out routine repairs. Observe simple recommendations:
- Check the condition of the fasteners, its reliability, assess the appearance of the panels and inspect them for damage.
- It is desirable to wash the panels at least once a month, dust and contamination reduce the efficiency of work, energy losses can be from 5 to 20%. Washing should be done with an ordinary hose with a nozzle, if necessary, you can gently wipe with a soft mop, but do not press on the surface.
- Inspect contacts and connections. Over time they may become loose or oxidized. Pay attention to joints in the open air. Do not forget to check the ground connections, they can also deteriorate over time.
- Clean dust from the inverter - if you don't do this, it will start to overheat. Also check the electronics for malfunctions and errors.
- Once a quarter, measure the batteries' charge level, and once a year, check the electrolyte density, if any.

If problems and malfunctions occur, it's best to contact a professional to fix them at the outset. Constantly check the readings through your computer or smartphone, there is all the information you need to monitor.
Install solar panels on the roof of the house with your own hands is not difficult, if you follow the instructions and buy everything you need to work in advance. The more detailed the project - the better, you should not do everything as it turns out, as the system is not safe. Remember that the inverter, if possible, should be placed as close as possible to the energy collectors.