How to change the dipped beam bulb
So, the car's headlight has gone out and it has become "one-eyed". If the installation of lighting elements was made in a car service center, and the lamp is still far away from its expiration date, then under the warranty contract it must be replaced free of charge. But not every car owner is ready to stay without vehicle for several days because of such trifle, as it happens with a big queue for service, therefore it is easier to replace a bulb yourself.
Fortunately this process in most cases is not very difficult, although not without some nuances. They are necessary to consider in detail.
Briefly about the service life of the head optics
In principle, any automobile light source has a certain life, measured in hours, for example:
- for halogen - 600-800 hours;
- for xenon - 2000-2500 hours;
- for LED - up to 20,000 hours.
It is worth bearing in mind that most drivers drive on low-beam for two-thirds of the time, using up the resource of this component.
Consequently, if a rough estimate lamp has already "run" the measured manufacturer time, it is probably time to replace the dipped beam lamp without much trouble with the diagnosis of the causes.
We recommend reading: What is the penalty for driving with a dipped beam headlight out of order?
What you need for replacement
The main suspect for a malfunction is the bulb. There are two approaches to check its functionality;
- Disconnect the contact block, turn on the light on the dashboard and check with a tester for voltage on the contacts.
- Check with a multimeter the contacts of the bulb itself to break the circuit (not suitable for gas-discharge xenonoks).
- Swap the broken element with the neighboring one on the opposite side to differentiate the breakage.
If the bulb is OK, you will have to check the entire electrical circuit going to the headlamp, starting with the fuse box.

It is also possible to assess the condition of the bulb visually.


The risk of occurrence of both variants increases if you leave traces of grease on the glass during installation. In the contaminated area, the heat sink is disturbed, resulting in either the tungsten filament burns out or the glass melts. That is why it is not recommended to touch the bulb with your hands.

This occurs when the ignition unit malfunctions, when there is an arc discharge inside the bulb.
Blown LED light source does not show itself outwardly, and to check it with a multimeter without disassembly will not work.
When there is no doubt in the source of the fault, it is time to replace the lamp for a new one. To do this you will need:
- rubber or cotton gloves;
- screwdriver;
- A new bulb, identical in parameters to the original one.
Gloves have to be worn before opening the box with the new device to avoid accidental touching the glass bulb with your hands. This rule is not necessary for LED light sources.
How to choose the right lamp
It is important that the light source corresponds to the technical documentation of the specific vehicle, since the installation of a more powerful or weaker device can disable the electronic control unit of the vehicle systems. To find the right model, you can remove the broken light source and take it with you to the auto supply store. Consultants will help you understand the markings and choose a replacement with the appropriate socket and wattage, although it is not difficult to figure it out yourself.

Read also: Types, markings and purpose of automotive bulb bases.
How to remove the dipped beam bulb correctly
First you will have to open the hood and install it on the support rod. There is no need to remove the entire headlight assembly in most cases. In some cases, the process of replacing the left and right dipped beam bulb may be different. For example, on the Volkswagen Golf 4 series, owners of large hands will have to first remove the battery, as it makes it difficult to access the left headlight assembly.
On some models, this may involve the hoses and even the fan on the radiator. Before disconnecting the electrical connectors it is advisable to disconnect one of the power cable pins on the battery to avoid damaging the on-board control systems.
Removing protection
When access to the under-hood and the headlight is secured, the removal of the lamp, depending on the model, is as follows:
- Remove the sealing cover, which may be on a latch.
![How to change the dipped beam bulb]() Push it off with a finger or screwdriver.
Push it off with a finger or screwdriver.![How to change the dipped beam bulb]() If threaded, remove by turning counterclockwise.
If threaded, remove by turning counterclockwise. - In systems without a cover, the rubber cover acts as a cover.
![How to change the dipped beam bulb]() If so, you will first have to disconnect the contact block from the lamp.
If so, you will first have to disconnect the contact block from the lamp.![How to change the dipped beam bulb]() Then remove the protective cover by pulling on its edges or special straps.
Then remove the protective cover by pulling on its edges or special straps.![How to change the dipped beam bulb]() In xenon lamps, the contact block is most often a single unit with the ignition unit.
In xenon lamps, the contact block is most often a single unit with the ignition unit.


These elements are disconnected by pulling them at right angles.
Pulling out the bulb
When access to the internal structure of the headlight is obtained, it is the stage of dismantling the bulb, the fastening of which comes in three types:
- With a clamping spring.
![How to change a dipped beam bulb]()
![How to change a dipped beam bulb]() In this case, the spring retainer must be disengaged by pressing on the wire and pulling it aside.
In this case, the spring retainer must be disengaged by pressing on the wire and pulling it aside. - On the latch, located at the top in the seat.
![How to change the dipped beam bulb]()
![How to change the dipped beam bulb]() The lamp is removed by successive pressing down on the base with the finger and then pulling upwards.
The lamp is removed by successive pressing down on the base with the finger and then pulling upwards. - It is mounted on twistlocks. The base is removed from the latches by turning the bulb counterclockwise by 15°.
![How to change the dipped beam bulb]() Once the bulb has been removed from its retainers, it must be removed from the socket.
Once the bulb has been removed from its retainers, it must be removed from the socket.


If the vehicle manual does not include a guide on how to replace light sources, a phone with a camera and flash will come in handy to make it easier to determine the type of mount. You'll have to point the camera at the mounting location and take a few pictures or a video that will show you how to disassemble the fasteners.
Correct Dash Light Bulb Replacement
If there is an adapter on the base of the bulb, it must be disconnected and connected to the new fixture.

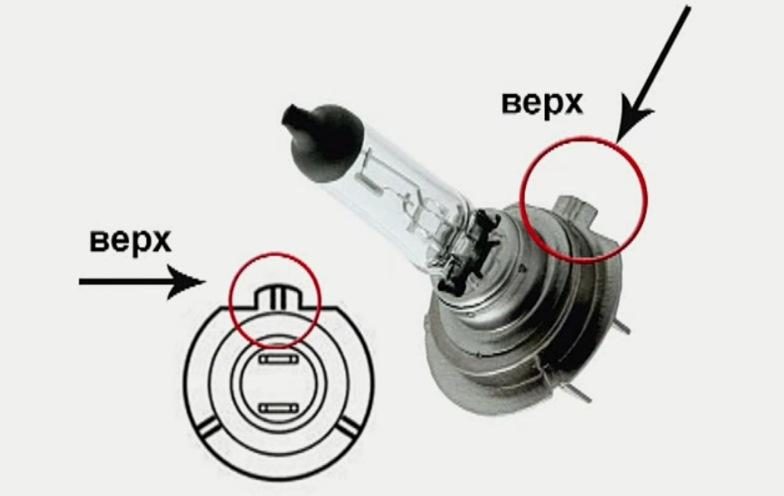
The H4, H7, H19 bases have special tabs arranged so that they can only fit in one position. Design grooves in the headlamp will not allow you to place the lamp on the wrong side. The subsequent assembly is done in reverse order:
- Hands in clean gloves, without touching the glass bulb with your fingers, the bulb is placed in the seating ears in the structural slots. Sometimes it is more convenient to install the bulb by visually controlling the process from the front, through the headlight glass.
![How to change the dipped beam bulb]()
- The protective cover is put on.
![How to change the dipped beam bulb]()
- The contact block is connected.
![How to change the dipped beam bulb]()
- With the appropriate design, the headlight unit is closed with a cover.
![How to change the dipped beam bulb]()


After the manipulation it is necessary to connect the power cable to the contacts of the battery and check the performance of the new lighting elements.
If the bulb happens to be accidentally dirty, then it must be thoroughly wiped with alcohol and dried with a dry cloth before installation.
What are the mistakes when replacing
Although the design of most bases do not provide the ability to install the headlight bulb in different positions, some owners manage to cram the bulb upside down, or even sideways. Happens most often with the H1 cap, which has no special ledges for the grooves in the landing place.

Although sometimes it happens with the H7 base.

In this case, the dipped beam will shine upwards, which is clearly visible if you put the car in front of the garage door and turn on the headlights. On a flat surface, improperly installed bulbs will form a spot of light with the right tick down, not up, according to the rules.

A correctly installed halogen bulb will be spiral up: this is the position where the rays are reflected from the reflector down onto the roadway in front of the car.
The second common problem is the attempt to install lighting elements not provided by the factory. For example, on some cars, installing a more economical LEDs, the same power as OEM halogen will lead to the fact that the on-board computer will give a notice of headlight failure and limit the speed of the vehicle.

The third mistake is chasing brightness and white color. This is especially important for northern regions, as white light with a temperature of 5000 Kelvin or higher does not penetrate fog, dust and rain well. And although yellow light from 3200 K is considered outdated and inconvenient, it is the spectrum that does the best job of illuminating the roadway in poor weather conditions. For the same reason, searchlights of rescue services do not make with white or blue light, so beloved by car owners for the clear outline and great brightness.
Video selection on replacement by car model.
Renault Duster.
Volkswagen Polo.
Skoda Rapid.
Hyundai Solaris.
Lada Granta.