Plywood light fixtures - features, tools and materials
Almost everyone can make a lamp out of plywood. But to get good results, you need to choose a model and understand the peculiarities of making it. It is equally important to make the system in accordance with the requirements of electrical safety, you should follow all the recommendations for assembly.
Features of plywood
This material is used for a variety of purposes, it is also suitable for the manufacture of light fixtures. It has its own characteristics, it is best to start with the advantages:
- Affordability. Plywood can be bought in any construction store, there are sheets of different thicknesses, which allows you to find the material for any project. The cost is low, but they sell products in large sheets.
- Attractive appearance. High-grade plywood has a beautiful wood surface. And you can find a version covered with a veneer of valuable species.
![Luminaires from plywood - features, tools and materials]() Chandelier made of plywood looks original.
Chandelier made of plywood looks original. - Wood is a safe and environmentally friendly material that does not emit any harmful substances when heated.
- Plywood is easy to work with. It can be cut with a hand saw or an electric jigsaw, or drilled with a screwdriver. By hand, using sandpaper, it is easy to sand the parts to a perfect smoothness.
- The surface is easy to cover with decorative compositions to emphasize the texture of the wood. Or paint the product in any color. Later you can repaint the light fixture.

By the way! Now you can cut perfectly flat parts with a laser, if there is a company in town that provides such services.
There are disadvantages of plywood, which must be taken into account:
- Wood does not tolerate heat, so it is better not to use incandescent lamps in the lights. Luminescent or LED versions will be suitable.
- The material ignites when exposed to open fire and high temperatures.
- With variations in humidity in the room, plywood can deform over time.
What materials and tools will be required
The exact list depends on the chosen option, but there are basic elements that are used almost always. As for tools, the following are most often used:
- Electric or manual jigsaw. The first is much more convenient, the second costs little, but the work will take longer.
![Electric jigsaw]() The electric jigsaw can cut parts of any shape.
The electric jigsaw can cut parts of any shape. - Manual milling machine. With its help, you can ennoble the contours and make shaped chamfers. It is also not uncommon to use an engraver or give workpieces to laser processing.
- A screwdriver or drill with a set of wood drill bits and crowns of different sizes. You can use at least one piece with which to make a chuck hole.
- A grinder or several pieces of sandpaper for sanding the surface and ends.
- A tape measure, ruler, construction angle and pencil to measure and mark out the material.
- A screwdriver and wire cutters are used to connect the wiring.

If you order ready-made parts according to your drawing, you will only need tools for assembly.
The list of materials most often consists of several basic items:
- Plywood of the selected thickness. Two or more different options can be used.
- Wood glue. It is also not uncommon to use small self-tapping screws or thin nails for joining.
- Paint or impregnation to treat the product. The composition is chosen individually depending on the desired effect.
- Light bulb socket, wires, a cord of suitable length, a switch and a power plug.
Sometimes in order to assemble a lamp from plywood with their own hands, ropes or metal plates are required. It is better to make a detailed list after choosing a particular option.
Interesting ideas - examples of popular models with drawings
Since there are so many varieties, it makes sense to determine in advance type of lamp. To make it easier to understand the features, several types with a description and drawing are presented.
Table lamp
This variant most often has a small size and is designed to perform work or serves as a decorative decoration and an additional source of light. The Bouquet of Flowers table lamp looks stylish while providing soft, diffused lighting.

The design is made of 20 elements, which are arranged in a circle. They are fixed on the upper and lower platforms. On the support part is also installed a socket with a small diffusing plafond. But you can use a LED lamp of the right size, it gives diffused light and almost no heat, which is important for a wooden product.

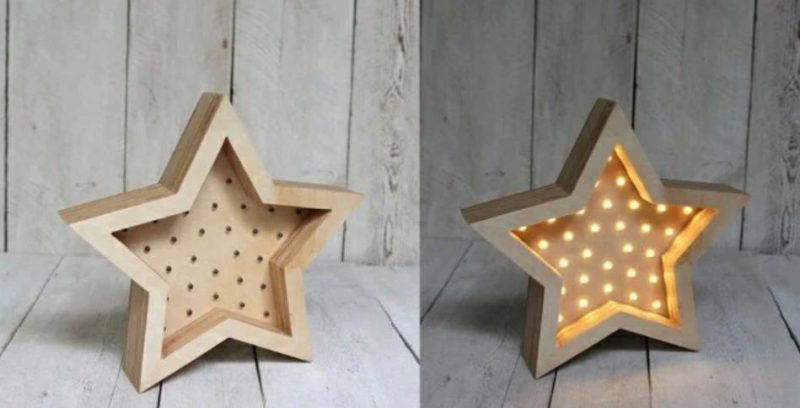
If you need to make a night light for the nursery or collect a Christmas craft, you can use the idea from the photo below. Such a table lamp made of plywood looks modern and is made simply: the base is cut out, holes are drilled in it for diodes, which are connected and connected to the power supply. The frame is cut out of several layers of plywood - the more there are, the deeper the diodes are located.
Master class: Making a table lamp in the form of a dog from scraps of plywood.
Wall lamp
Here, more often use a plafond of a suitable configuration, which hangs on a wooden or metal mount. Sconces from plywood are not difficult to make, using the option shown in the photo.

There is no point in specifying the dimensions, because it all depends on the required dimensions and the power of the lamp used. Two octagonal blanks are used for the upper and lower parts. At the top make small holes for ventilation, in the bottom one large, it can be covered with a plafond, and you can leave if the lamp is diffusing.

On the sides there are 8 identical slats, in which cutouts are made for lighting. There are no requirements, the more cutouts, the better the light. The main thing is to make all the parts the same and fasten them evenly with glue. If you make a support, you will get a stylish floor lamp.
Video lesson: Making an LED lamp out of plywood in one day.
Chandelier
When choosing a particular version of a chandelier made of plywood, it is worth taking into account room design. There can be many variants, most often use products with a large number of parts, which are made of thin plywood.

Since the product is hung on the ceiling, the load most often falls on the power cable. It is worth choosing options in strong thick insulation, they can easily withstand the weight of the plywood construction. In the manufacture, the main attention is paid to the accuracy of fitting parts, as they must be well matched to each other.

The dimensions of the elements are chosen individually, since the dimensions of the chandelier can vary. If this option is too complicated, you can find a simpler solution. An example is shown in the photo below.

Step-by-step video instruction.
Video master class: Sawing a lampshade from plywood with a jigsaw.
Sketch preparation, parts making and product assembly
The process is described on the example of a table lamp, the drawing of which is above. To assemble it, you will need plywood with a thickness of 3 to 5 mm. It is best to use material of the first grade of hardwood. The work is carried out as follows:
- From the paper Make molds to the exact size. Then their contours are transferred to the plywood, it is easier to do it through an ordinary carbon copy. Before you begin, the sheet should be glued with scotch tape, so that it does not move.
- The parts are cut out with the jigsaw. This is the main working tool, so you need to buy thin blades with a fine tooth in advance to ensure the best cutting quality. Also, small width options are best for cutting curves and small elements.
- It's a good idea to make all the connection cutouts on the pads and side pieces with a router. Then they will be the same size, which will simplify the assembly.
- The ends and the surface are sanded by hand or machine. Parts should be smooth.
- The surface is cleaned from dust and treated with varnish or impregnation. Work continues after it has dried.
- When assembling, glue is applied to the joints, and then the parts are joined and fixed. When about half of the luminaire is assembled, a socket is placed inside and the wiring is pulled through. Then the product is glued to the end and left to dry with glue.
It is better to apply the impregnation in several layers, so that the coating is resistant.
Making an unusual lamp out of plywood is not difficult if you have an accurate drawing and the necessary tools for the job. To ensure safety, the wiring connections should be closed with heat shrink or use pads. It is desirable to put LED lamps, as they almost do not heat up.