How to Make a Flashing LED with Your Hands
Features of human perception is that we are better able to notice not the value of the parameter, but its change. That is why all warning and alarm systems use intermittent sounds and glow. It is easier to attract the attention of the operator or other people. Such a solution is used for other purposes as well. For example, in advertising. Therefore, a flashing LED is widely used in a variety of electronic circuits.
What do you need to make
You can buy ready-made LEDwhich, when energized, will begin to flash. In such a device, in addition to the usual p-n junction, there is a built-in electronic circuit, made on the following principle:
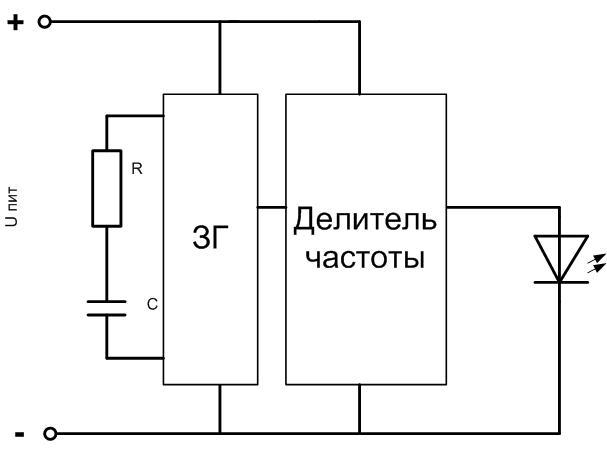
The basis of the device is a master oscillator. It produces pulses with a relatively high frequency - several kilohertz or tens of kilohertz. The operating frequency is determined by the parameters of the RC-chain. Capacitance and resistance are constructive - they are elements of the LED device. This way it is not possible to get a large capacitance without a significant increase in the size of the device. Therefore, the RC product is small, and operation at high frequencies is a forced measure. At a frequency of several kilohertz the human eye does not distinguish the blinking of the LED, and perceives it as a constant glow, so an additional element is introduced - a frequency divider. By successive division it reduces the frequency to a few hertz (depending on the supply voltage). This solution is more advantageous than using a capacitor with a large capacity in terms of mass and dimensions. The lowest supply voltage of the ready flashing LED is about 3.5 volts.
How to make a blinking LED
Blinking LED making it yourself is not difficult. In many cases, you only need a few additional elements. Simple schematic variations are shown below.
The flashing light on a single transistor
Such a blinker is easy to make with your own hands on just one transistor.
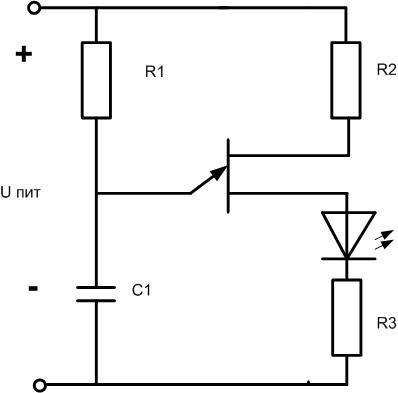
The circuit is built on a single junction transistor. You can install a domestic element KT117, you can pick up a foreign analogue. The frequency of oscillation is inversely proportional to the product of R1C1. Ratings and purpose of elements are given in the table.
| R1 | C1 | R2 | R3 |
| From a few kilohms to tens of kilohms. Together with C1 sets the oscillator frequency. | To get a frequency of 1...3 Hz, it is necessary to choose a value of 10...100 μF, correct the frequency by selecting R1. | It limits current through transistor and LED. It is chosen depending on supply voltage, at 10 V to set current of 10 mA nominal value must be 1 kOhm. | Few tens of ohms |
The supply voltage can range from 4.5 to 12 volts. The disadvantage of this circuit is the use of an oxide capacitor of large size - much larger than the LED itself. But it contains few elements and works immediately after error-free assembly. If you can not get a single junction transistor, you can make its counterpart on two bipolar transistors.

Any two transistors of p-n-p and n-p-n structure can be used. For example, domestic pairs of KT315 and KT316, KT3102 and KT3107 or any other Russian or foreign devices.
LED flashing from a battery
This circuit is simple, not difficult to make, does not need adjusting (except, maybe, the selection of parameters of time-chain). However, it has a feature, which in some situations can be critical - it requires a voltage of 4.5V or more. This voltage would require at least three AA batteries or CR2032. And even a small drop in power due to discharge can cause the circuit to malfunction.
Almost all common light-emitting elements require 1.6 V (and often 3 V) to glow, so building a simple blinking LED circuit to be powered by a 1.5-volt battery is impossible. But it is possible to make a relatively complex - with a doubling of the voltage.
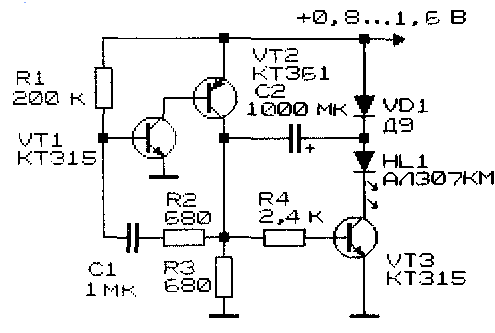
On transistors VT1, VT2 an oscillator is assembled, which sets the frequency and duration of the flashes (they are determined by circuits R1C1 and C1R2 respectively). During the pause capacitor C2 is charged almost to the power level. During the flashing time the switch VT3 opens, VT2 closes and the capacitor is connected in series with the power supply. So the voltage on the LED is doubled.
Diode VD1 must be a germanium diode. On a silicon diode in the open state the voltage drop will be about 0,6V - in this case it is very high.
It may be useful to read: Blinking LED without any circuit
Making LED strips
A popular lighting device, which has become widespread, was the LED strip. It is a flexible base on which are applied parallel chains of connected in series limiting resistors and LEDs. This tape is supplied in the form of a coil, which can be cut in certain places.
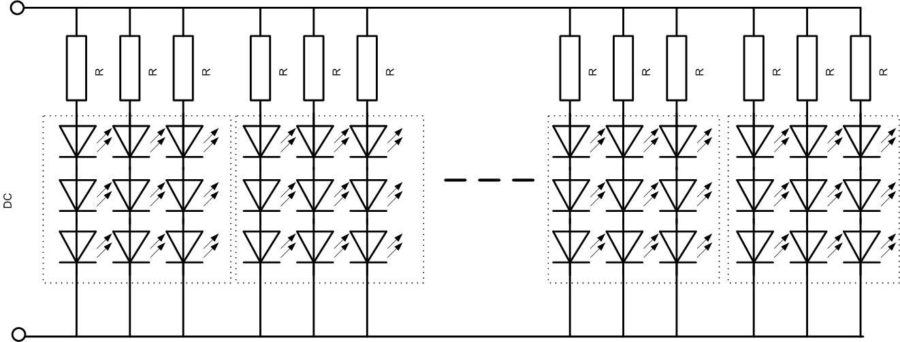
From the diagram it can be seen that the lighting device from a single LED is characterized by an increased supply voltage due to the serial inclusion of several elements and increased current consumption caused by the parallel connection of many circuits. Therefore, the power supply must be powerful enough, hence - dimensional. So on the size of the circuit elements for the construction of LED strip light to save no sense. The paradox is that for such a strip you can build a super-simple signal generator.
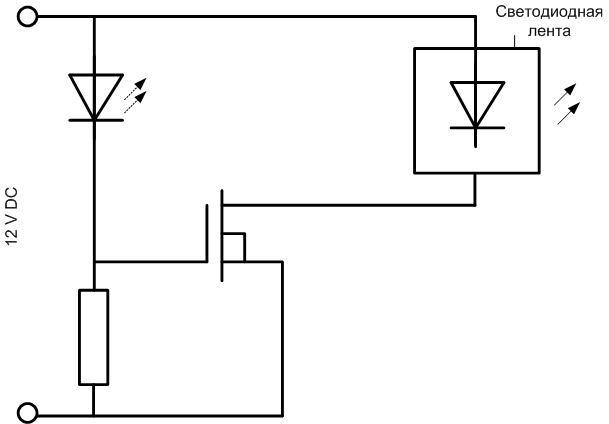
To do this, you will need:
- A flashing LED;
- a current-limiting resistor;
- A powerful field effect transistor (IRLU24N or similar with similar parameters can be used);
- strip itself;
- power supply.
The LED will turn on periodically by applying and removing voltage to the gate of the transistor. The key will turn on and off in tact, turning the LED strip on and off. The flasher can be ramped up if a second lighting device is required to turn on and off in counter-phase with the first.
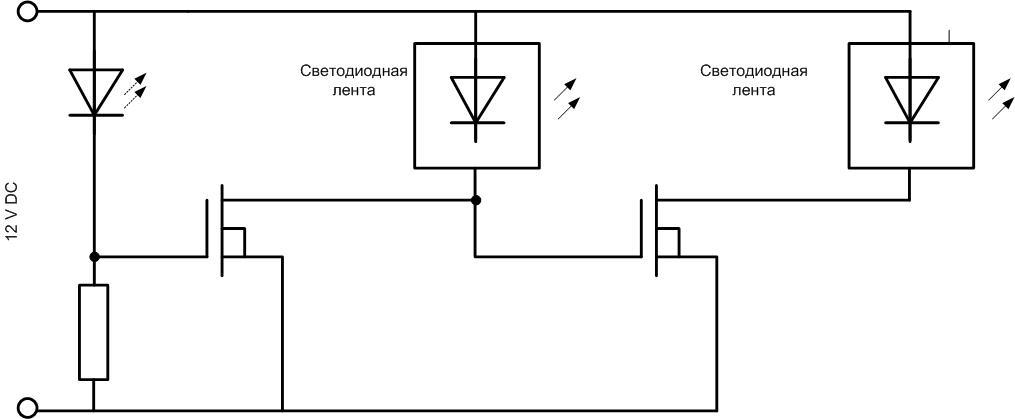
If one strip is on, the second will be off, and vice versa.
You can use a separate power supply for each strip, but the common wire (minus line) must be connected.
This scheme has the undeniable advantages of simplicity and cheapness. But there is a disadvantage - the frequency and duration of blinking are determined by the parameters of the LED, and you can change them only by power supply voltage at the same time. To be able to set separately the period of flashes and their duration, you need a more complicated circuit. For this you need a chip KR1006VI1 or its foreign counterpart NE555. The advantages of this chip are:
- small size;
- low power consumption;
- the ability to separately regulate the duration of output pulses and the pause between them.
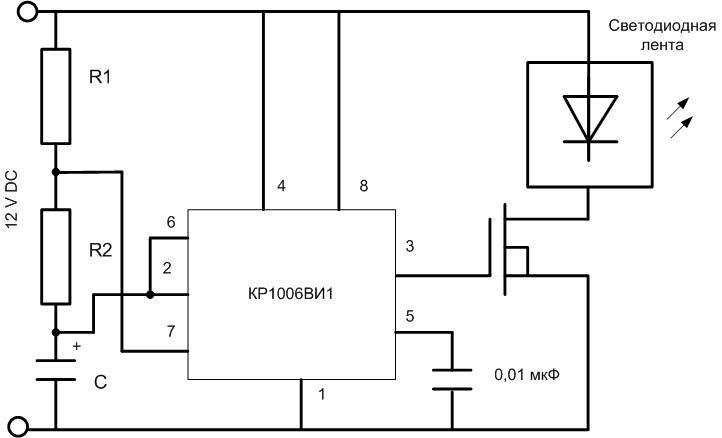
Parameters of oscillations are set by elements R1, R2, C:
- ON duration t1=0,693(R1+R2)*C;
- pause duration t2= 0.693*R2*C;
- generation frequency f=1/0.693*(R1+2*R2)*C.
If you want, you can put variable resistors instead of R1 and R2. In this case the flashing mode can be adjusted promptly.
The power supply of the chip should not exceed 15V. If you use 24 volt tape for the chip must provide a separate source or make a regulator 24/15 volt (suitable simplest parametric on the stabler or on an integrated regulator 7815).
It is easy to make a flashing light out of a LED or ribbon. To succeed you need a minimum knowledge of electrical engineering, simple skills and a few radio elements.