Detailed instructions for disassembling a light switch
When repairing, replacing, or otherwise doing this, you will have to disassemble the switch. This is not a difficult procedure, but it is a dangerous one, and it requires adherence to rules. There are also a number of nuances concerning certain types of switches.
Tools needed
As before starting any work, you must first prepare all the tools. To disassemble the switch, one small-sized flat screwdriver is usually enough. Some designs include fasteners with Phillips screws, so a Phillips screwdriver will also be required.
You should also have a test screwdriver to check the voltage. You may need electrical tape, sandpaper, and a knife to repair the switch.

Peculiarities of disassembly of different types of switches
There are several switch designs on the market, and their disassembly may differ slightly. It is better to immediately learn the nuances of working with non-standard mechanisms:
- Three-key. Used in rooms where there are many spotlights or several different types of lighting. Each of the buttons is responsible either for turning on a particular device, or for its own area. The keys themselves at the same time are quite thin, they need to be removed one by one. Usually there is a small hole in the bottom, which you can pick up with a screwdriver to remove.
- Dimmer. This type of switch is regulated by a rotary mechanism. The principle of removal is the same, only instead of the button, the rotary knob is removed.
- Sensor. To disassemble this technological version of the switch, you need to remove the outer panel. Usually a special tool for this is included in the kit. If it is not available, you can use a flat screwdriver, but you need to do it very carefully, because the glass of the panel can be damaged.
![Detailed instructions for dismantling light switches]() When removing panels from touch devices, the main thing is not to damage them.
When removing panels from touch devices, the main thing is not to damage them. - Paired design. Double version, where in addition to the switch there is also a socket, you will have to disassemble it completely. It is necessary to start with the socket, because there is usually a mounting bolt.
- Pass-through. By design does not differ much, except that the number of wires inside the box.

Disassemble the light switch with the installed indicator can be the same way. An additional advantage of indication in the design - without a special screwdriver you can know whether there is voltage.
Obligatory stage - disconnecting the power supply
Any work carried out with electricity should be carried out after its disconnection. In the house, the wiring is usually divided into several parts. Each of the branches is responsible for its area and functions on it.
Circuit breaker is usually in the corridor or basement, it turns off the desired lever, then check the voltage at the output. If you are not sure which lever to turn off, it is better to turn off the circuit breaker completely.

As for apartment owners, their switchboard is on the floor in the entryway. The main thing is not to mix up and not to turn off the light to the neighbors.
Errors in the design can affect the process. Sometimes the neutral wire is connected to the circuit breaker instead of the phase wire. Such a system will work, but there is always voltage in it, so it is rechecked. To solve such a problem, you will have to change circuit wiring.
Instructions for removing the switch from the wall
The work of dismantling consists of several stages. At each one, you must be careful not to damage the plastic construction. First it is necessary to remove all the keys from the light switch, because it is impossible to remove the entire construction at once.
Ways to remove the keys
You can remove the keys by hand. To do this, the lower part is pressed firmly, and the tab of the upper part should be pulled. But it is better to use a screwdriver or other flat object, so the risk of breaking the element is reduced, but there is another risk - if you are not careful you can scratch the construction.

If the switch is not single-key, and there are two or three keys, then using the method described above, each key is removed one by one, starting with the last.
Removing the frame
Once the keys are removed, it remains to remove the frame. Mounting depends on the design of the switch. In some models, all at once remove, in some - separately the frame and separately the core.
According to the type of fastening, the most common type is a screw connection. In this case, you will need a screwdriver, the work of removing it will take only a few seconds.

The second fastening mechanism is a clamping mechanism. In such a design, you only need to bend these elements one by one.
How to remove the mechanism from the socket
After removing the frame in the indoor or outdoor switch, it remains to unscrew the mechanism from the socket embedded in the base of the wall. Usually the screw option is used, so you will need a flat or Phillips screwdriver.

Additionally, there may be "spacers" in the design. These are special elements that separate when the screws are screwed in. They hold the mechanism more tightly inside, but loosen when unscrewed.
Sometimes the sockets are installed in special mounting boxes, especially often this element is in outdoor designs. There are screws on such a box, which should also be loosened.
Disconnecting the wires
After you managed to open the switch and pull it from the wall, it remains to disconnect the wires. They are fixed by two methods:
- Screw .. In such a mechanism, screws hold the voltage wires in the terminals, they need to be unscrewed slightly (not completely), and then you can pull the cable out.
![Detailed instruction for taking apart a light switch]() Screwed wire clamping design.
Screwed wire clamping design. - Spring-loaded. Devices with spring-loaded terminals have special levers that must be pushed to disconnect the wires.

It's best to remember which side of the wire was secured. This will make it much easier to install the new switch.
Step-by-step assembly of the switch
To reassemble the switch, you need to repeat everything in reverse.

Instructions:
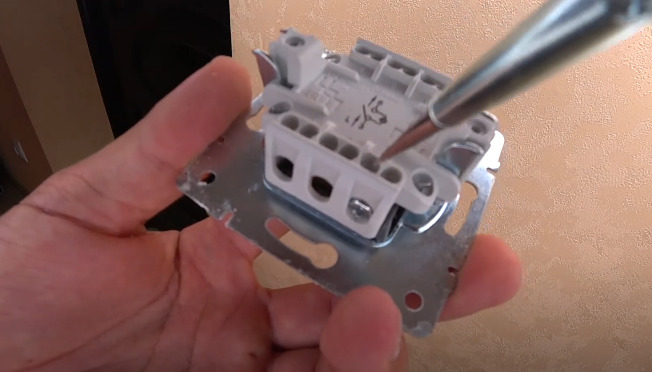
- On the inside of the mechanism is a diagram on which the phase is designated by the letter L.
![Detailed instruction for taking apart a light switch]()
- The wires are inserted into the connection points, the screws need to be screwed in. If an unused wire remains, it must be insulated.
![Detailed instructions for disassembling the light switch]()
- The design is inserted into the socket, secured with screws.
![Detailed instructions for dismantling light switches]()
- The frame is inserted. That it is in its place will indicate the characteristic click.
![Detailed instruction for taking apart a light switch]()
- Before the click a button is inserted.
![Detailed instruction for taking apart a light switch]()


Thematic video will help to understand the replacement of switches.
Disassembling the combined socket and switch

The design, combining a socket and a switch is easy to use. If you need to repair or replace, you will have to remove the entire twin body at once. In addition to the screw, which is usually in the middle of the socket, there is another locking element located under the keys.
Disconnecting the wires is no different than disconnecting a normal switch.

The nuances of disassembling switches of popular brands
There are design features not only in different types of switches, but also among the products of different manufacturers. The main nuances to consider.
- Makel. The frame of the switch is fixed by special elastic elements that go deep into. To get to them, you need to pull the overlay toward you. Also note that the screws are on the inside, so access to them will be only after pulling the mechanism out of the sub-socket.
- Legrand. This manufacturer equips products with petal retainers, which hold in the socket. These retainers must be loosened before removal.
![Detailed instruction for taking apart a light switch]() The mechanism of the device from Legrand.
The mechanism of the device from Legrand. - Wessen .. To remove the keys from the Wessen devices, you need to grasp and press the protruding side, pull toward you. From the grooves will come out of the locking elements, the buttons can be left aside. Wessen switches are equipped with a solid lining construction, which is fixed on two screws.
- Lezard. The company has switches with different locking elements for the frames. If they are screws, they need to be unscrewed with a screwdriver, and the side latches are unbent with a screwdriver, knife, or other thin object.
