How to fix a LED spotlight if it stops working
Sooner or later, every owner of lighting equipment, including LED spotlights, faces a malfunction of devices - nothing is permanent on Earth. To fix or throw away - such a question sometimes has to be solved very quickly.
How does the LED spotlight
Externally, the LED spotlight works the same way as its incandescent counterpart. Only it consumes less electricity and is more durable. In fact, it emits light based on very different physical principles. "Illich bulb" - the basis of obsolete lamps - shines due to the red-hot filament. To do this, it has to be heated, and the efficiency of this process is only 3-4%, like the first steam locomotives. The remaining 96-97% of energy goes into heat.

LEDs are another matter. Here, the emission of light is associated with physical processes occurring in the p-n junction of a diode made of a special semiconductor (usually gallium arsenide), and does not depend on the degree of heating. The efficiency of such a light source reaches 60% (as assured by manufacturers). The rest goes into heat (there is no way around the Joule-Lenz law), so you have to take measures for heat dissipation. Otherwise the lifetime of LEDs will drop dramatically.
Diagram of LED spotlight
LED-lighting can be built on a different element base, but the block diagram of the LED spotlight is usually the same.

The purpose of the terminal (terminal or connector) and the LED matrix is clear. The driver is a power supply that stabilizes the current. It is the invariability of this parameter that is important for the long-term operation of the light-emitting elements. In low-power flashlights, the driver is replaced by a resistor. In this way the design is cheaper, but on the resistance uselessly dissipates a significant part of the power.
Signs of failure
The most obvious sign of malfunction - the spotlight does not light up when the voltage is turned on. Also abnormal modes of operation of the illuminator are considered:
- reduced brightness of luminescence;
- flickering;
- Visible absence of luminescence of one or more elements;
- change in the color of the radiation.
In all of these cases, you can try to repair the spotlight.
Caution. If the LED-lighting shows visible signs of overheating, melting of cable insulation, sparking, it should be immediately disconnected from the 220 V supply voltage.

Causes of breakage
Causes of failure of LED - equipment can be different:
- Mechanical damage caused by outside interference (vandalism, accidental impact of mechanisms, etc.).
- Natural aging and failure of components. It cannot be avoided in any case, but the reasons for reduced service life can be:
- application by the manufacturer of low-quality materials that deteriorate in a short period of time (terminals, wires, thermal paste, etc.)
- use of poor-quality electronic components (LEDs and driver elements);
- use of components that do not meet the operating conditions in order to reduce the price (wires with a smaller cross section, terminals, not designed for the rated load, etc.)
- application of circuit solutions, making products cheaper, but negatively affecting the reliability (lack of protection against overload, etc.)
- violation of production technology (fixing the matrix to a smaller number of screws with a concomitant reduction in the efficiency of the heat sink).
When repairing it is necessary to try to identify not only the faulty element, but also to understand the cause of its failure. If possible, it is necessary to modify the circuit and the design (replace wires, terminals, use higher quality components, etc.). In this case, the chances that the device will work longer after the repair.
We recommend that you watch:
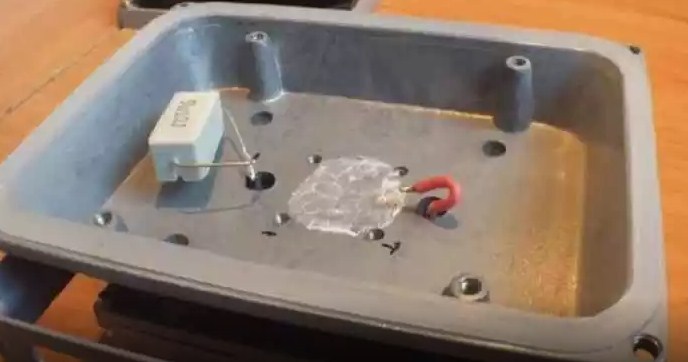
Diagnosis
Repair of any LED spotlight should begin with diagnostics - finding the faulty element. This is an important step. The more precisely the failed unit is identified, the more accurate will be the decision about the expediency of repair and the costs associated with the erroneous replacement of serviceable components will be excluded.
The first thing to start identifying a malfunction is an external inspection. In this way you can identify mechanical damage, sparking, etc. At this stage, you can identify obvious irregularities. If everything is OK in this part, the illuminator should be disassembled.
Important! Disassembly can be carried out only when the power supply is switched off and you have made sure that there is no voltage. Do not check absence of voltage with a test lamp - only with a voltmeter or a low voltage indicator!
The first thing to do is to check for visible damage - burned blocks, melted insulation, etc.

Components with such damage must be immediately discarded with two things in mind:
- Even if a unit with outward signs of damage appears to be functional, it is already potentially unreliable and may finally fail in the near future;
- The cause of module failure can be related elements, even if they do not have external signs of damage (the cause of melting of the terminal block can be a faulty driver, a non-working matrix can lead to a failure of the current regulator, etc.).
If everything looks fine, you can check if the driver is working.

First, you should read the input and output parameters, and make sure that the device is designed to work from a domestic single-phase electrical network. If everything is all right, you should supply 220 V to the driver input and measure the voltage at the output. Without load it may be slightly higher than indicated. If you load the output with a resistor whose rating is calculated according to the formula R=Up/Ip (in this case 35 V/0,6 A=59 Ohm, you can take the standard rating of 56 or 62 Ohm), then the output voltage should lie within the specified limits. Next you should measure the output current. If you don't have milliammeter, you can calculate the current according to the formula I=U/R (substitute real measured values in the formula).

If the current is equal to the one you have indicated, then the power supply is guaranteed faulty and you can go on to check the LED matrix. It must be connect to the power supply with the output voltage read from the label on the driver (the current for control can be found there as well). When connecting, pay attention to the polarity. Failure can be detected by the glow. If there is no light (due to failure of 1-2 LEDs) or no light at all, the matrix should be replaced or repaired.
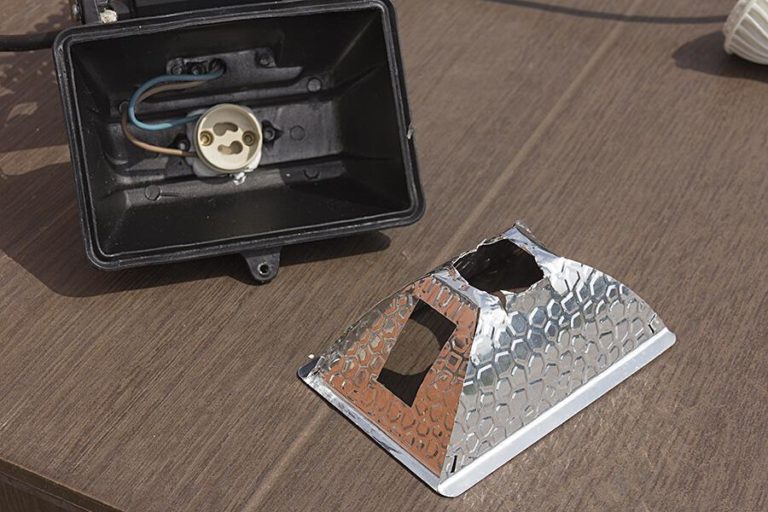
How to disassemble a LED spotlight with glued glass
The design of many lights is such that you can get to the other components can only remove the glass. At high-end projectors frame with glass is often mounted on bolts. Most economic class devices glass to the reflector compartment is glued with sealing compound, and it can be difficult to remove it.
How to remove the glass from an LED spotlight
If you need to disassemble the device with glued glass, as a first step, you can try to gently scrape off the sealant (at least part of it) with a sharp knife or small screwdriver. If it does not help, you should try to warm the frame around the perimeter with a construction hair dryer and pick it up with a sharp object. If you fail here too, there is another way.

Most spotlights have a screw on the back, the purpose of which is most likely to be a plug to seal the interior space after assembly. Sometimes it is enough to unscrew this screw so that the pressure inside the luminaire is equal to atmospheric pressure (rarefaction can appear because of air cooling inside the device). After that you can try to repeat the operation with warming and undercutting the edge. If this does not work, you should find a screw with the same thread, but longer. This screw has to be screwed in place until it stops. After that, you should try to heat the joint again, gently tightening the screw. And when the glass moves, pick it up in this place and continue heating along the perimeter, gently tearing away along the rest of the length.
Replacing Parts
Parts for replacement can be found in stores that sell LED equipment. It is necessary to choose according to technical parameters, but it is also necessary to control the installation dimensions. It may happen that there is a driver on sale that suits the technical characteristics, but not suitable in terms of installation dimensions and dimensions. In this case it is necessary to evaluate the possibility of installation in the existing enclosure and, if it is possible, to drill additional holes for mounting.
You can also buy spare parts online, in Russian and foreign stores. If a keyword search does not yield the desired result (especially for light-emitting arrays), some Chinese marketplaces have a photo search function. In some cases, this method yields results.
Even as a donor you can use the same type of lights, failed. From 2-3 faulty spotlights can often be assembled one workable.
Features of repair
It is not always necessary to rush to throw away a faulty element. In many cases, it can be repaired.
If the matrix contains several clearly defective LEDs, you can try to unsolder them and replace them with new ones. Soldering should be done carefully and quickly, without overheating the adjacent elements and connecting tracks. If the number of faulty emitting elements is small (1 or 2) you can short-circuit the place of the removed element in the hope that the driver will adjust the normal mode.

But you should not abuse this method of repair.
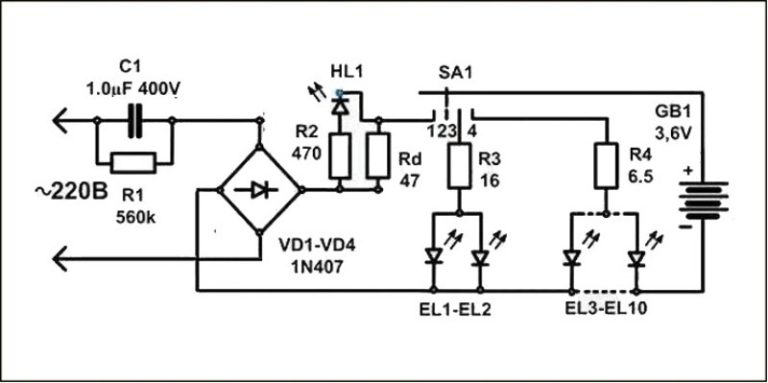
To fix the driver, you should try to find its circuit diagram on the Internet. Almost all inexpensive drivers use the pulse-width modulation (PWM) method for current control and have approximately the same structure:
- rectifier (diode bridge);
- smoothing filter;
- driver chip;
- power switch.
A typical method of troubleshooting can be seen on the example of the common driver on the chip CL1502.

To check the first two elements, a tester is sufficient. The sequential algorithm of the test is shown in the table.
| No voltage at point | 1 | 2 | 3 |
| Defective elements | Check the voltage at the driver input terminals, check if the R0, CX1, VR1 elements are OK | Check if the diode bridge D1, D2, D3, D4 is functioning properly. | Check the serviceability of the smoothing filter elements (first of all L1, C1, C2). |
Next you must check the voltage on pin 4 of the microcircuit, it should be 40-50 V.
Danger! The power supply circuit is transformerless, each element is under full line voltage to ground. Strictly observe the safety precautions!
If you have an oscilloscope and are able to use it, further tests can be carried out. At point 4 there should be pulses. If there are no pulses, then the microcircuit is defective. If the pulses are present but there is no output voltage between points 5 and 6, you must check the elements of the power switch (first of all the elements D5, L2, C5).
When installing a new LED matrix it is necessary to observe a couple of important points:
- Completely remove the remains of the old thermal paste from the seating area, wash the surface with a solvent, and after drying, apply a sufficient layer of new paste;
- attach the new matrix using the full number of screws (you cannot use two screws instead of four) to ensure a full and even fit to the heat sink.
In rare cases, a faulty LED spotlight cannot be repaired. Usually it can be repaired. The economic feasibility of repair in each case determines the owner of the lighting device.