How to arrange LED aquarium lighting
LED lighting for the aquarium has become widely used relatively recently. Many people still put the traditional options in the form of incandescent lamps or halogen lights. But if you understand the issue and properly arrange lighting using LEDs, you can provide ideal conditions for aquatic life and plants.

Features of LED lighting
This option differs from the others primarily in terms of safety. In the manufacture of LEDs do not use poisonous and dangerous substances, and if the type designed for a voltage of 12 volts is used, then nothing terrible will happen when in contact with bare wires. In addition, this type has many other advantages.
Pros and cons
It is worth starting with the advantages, as there are many more. First of all, it should be noted that the direction of LED lights for aquariums is rapidly developing and every year there are new models. Over the past few years, this backlighting has gone from being a little common to one of the most popular around the world. In addition, it is worth noting additional advantages:
- During operation, LEDs almost do not heat up. Thanks to this, there is no need to remove excess heat, as is the case with metal halide lamps in large containers. Not only is the cooling system complicated, but it's expensive, plus it constantly consumes power.
- The lifespan of LED lighting is many times longer than that of any other counterpart. Incandescent bulbs burn out on average once a year. And metal halide options, even expensive ones, after six months of use begin to change the spectrum, which has a bad effect on the plants. LEDs do not change the spectrum for at least 5 years.
- Energy consumption of this type of lighting is many times lower than any other solution. The savings are enormous given that the light lasts a long time. LEDs consume a minimum of electricity, it is the most economical solution today.
- If you install a dimmer, you can adjust the brightness of the light. This is not possible in any other luminaire. But, most importantly, when you change the brightness of the spectrum is not shifted and the plants get exactly the light they need.

The light flux in the diodes is directed and distributed at an angle of 120 degrees. It is not scattered, which further increases the efficiency of lighting.
The main disadvantage is the need to install the power supplySometimes it is difficult to find a place for it. But if you want it can be put some distance away to place it next to each other. Another point - the complexity of selecting a light fixture of the right size for old aquariums, but if necessary, you can assemble the lighting even with your own hands.
Methods of illumination
In the past, only one top-mounted luminaire option was always used because the lamps did not allow for other solutions. In addition, the heated light elements posed a danger with any other method of installation, an additional heat dissipation system was needed. Thanks to LEDs, lighting can be implemented in three different ways:
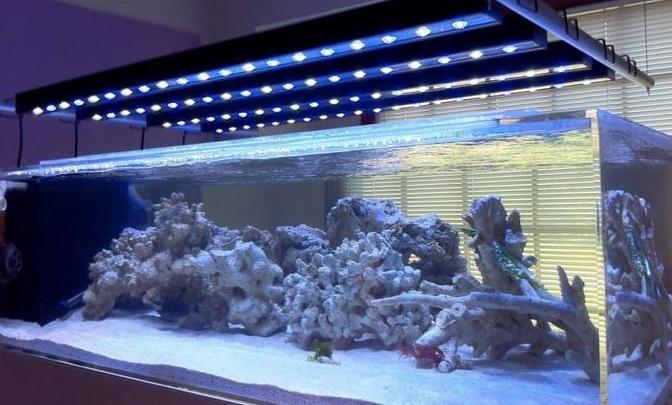
- Solid overhead lighting. The traditional option, involves the location of one or more light sources from above. And the lamps or a diode strip can be placed both under the cover, and at some distance, if a homemade version is used and thus the intensity of light is regulated. It is best suited for containers with a square or rectangular shape. Ideally, if the aquarium will be one or 2-3 species of fish with similar preferences and a moderate number of plants.
- Side lighting The aquarium is equipped with a solid or spot type of lighting. Suitable for aquariums of small width, built into the furniture. In this case, the lighting comes from the back and side walls so that the light cones do not intersect in the water. It is best to use LEDs with minimum brightness or adjust it with a dimmer. This option allows you to create the effect of inverse tiering, when the best light is the bottom of the tank, the top is shaded, and the bottom gets only reflected light.
- Perimeter lighting. In this case, the LED strip is located along the vertical or horizontal edges of the aquarium. The light comes in from all sides and illuminates the tank normally, while it is not very much, which is important for many plants and fish. The method is great for aquariums with many fish and plants, it does not overload the space and can be used around the clock. And the tape consumes little electricity, so this method is also the most economical.

It is best to use aquariums rectangular or square shape. Round or oval variants qualitatively illuminate much more difficult.
Calculating the lighting for the aquarium
For normal life of fish in the water must be a sufficient amount of oxygen, most of which is produced by plants. For this, they need a certain amount of light, so it is important to calculate the optimal level of light. In addition, if the plants are in the dark, the carbon dioxide content in the water increases, which is extremely dangerous. Therefore, the calculation should take into account several recommendations:
- Previously, the power was calculated in watts (W), but this option is not suitable for LED equipment. Therefore, first of all, you need to select the indicator of illumination per liter of water, it is calculated in Lumens (Lm). The requirements are as follows: 50 Lm - the average value, suitable for most aquariums, 40 Lm - an option for tanks in which a lot of ferns, mosses and similar plants, 60 Lm - the norm with a dense population of fish and plants that require extra light.
- Even more accurate can be calculated if you use the rate of light in lux. 1 Lux (Lk) equals light of 1 Lm distributed over an area of a square meter. There are standards, which should be guided. Thus, for rectangular aquariums with undemanding plants, the optimal range is from 6 to 10 thousand lux, photophilic options to increase the value to 10-15 thousand. To calculate, the aquarium area in square meters multiplied by the rate of illumination. For example, 0.2 x 10 000 = 2000, where the result - the required lamp power in Lumens.
- It is worth taking into account the reflection of the water. If a cover is used, the figure will be 20%, without a cover can be lost up to 40% of the light, which is also significant. When the cover is white on the inside, the loss will be reduced by 20%, and if you use reflectors, you can increase the efficiency of LED lamps or strips even more, below there is a picture with a comparative analysis.
- Another factor is the loss of brightness of light in the water with increasing depth. It is because of this used such high standards of light for aquariums. The calculations are in the diagram below, and by them and need to determine the level of illumination. The values are given as a percentage, so it is easy to adapt them to their own conditions and calculate the appropriate figures.


Too much light is just as dangerous as too little - instead of a beautiful aquarium you might end up with a blooming swamp, which will not look good.
In addition to brightness, there are other aspects that are important. They are also worth considering in order to create comfort for all the inhabitants and improve the appearance of the aquarium:
- Color temperature. - is a value that determines how the surroundings are perceived. It is measured in Kelvin. Thus, at noon, when the sun is at its zenith, its brightness is about 5500 K. This is where you have to remember that light that is too dull is too yellowish and too white distorts colors. For plants, the best approach the range from 6500 to 8000 K, fish, depending on the species need from 5500 to 20,000 K, and reefs - from 9000 to 20,000 K.
![The color temperature greatly affects the perception of the contents of the aquarium.]() The color temperature greatly affects the perception of the contents of the aquarium.
The color temperature greatly affects the perception of the contents of the aquarium. - The spectrum is another important indicator that directly influences the photosynthetic processes of the plants. Therefore, it must be chosen carefully, keep in mind that for the light-loving crops is more important blue and red shades, and for the unpretentious blue will only do. Select options according to the contents of the aquarium, so that the plants do not get sick and develop in ideal conditions.
![The effective range for plant photosynthesis.]() Effective range for plant photosynthesis.
Effective range for plant photosynthesis. - The last factor when planning lighting is the length of the daylight hours. In order to keep fish and plants in conditions as close to natural as possible, you need to provide light for 10-14 hours a day. In order not to turn on and off the light manually, it is best to buy a timer that can be adjusted by time and works in standalone mode.


Around the clock lighting of the aquarium with LED lights is undesirable, because this will begin to actively multiply algae.
How to make LED lighting with your own hands
You don't have to be an electrician and know a lot about electronics to put together a lighting system yourself. It is enough to know how to use a soldering iron, and sometimes you can work without it, it all depends on the method chosen.
Using standard bulbs
The option is suitable if large or small sockets for bulbs are already built under the cover. Instead of the usual incandescent bulbs are simply screwed in LED with the right brightness and spectrum. It's very simple and takes a few minutes.
But with this it's important not to overpower the lights. If you get a lot of light, you can reduce the brightness by installing a dimmer. It should be added to the system instead of the standard switch and connect according to the instructions, which are always given when buying.

You can also remove the reflector, if any, so that the light is scattered and not concentrated in one direction. In this way, the brightness can be made much lower.
If the aquarium is equipped with a cooling system, which is required when using halogen lamps and filament options, it should be turned off to reduce electricity consumption.
LED strip
Illumination of the aquarium with LEDs, fixed on a strip - one of the easiest and most convenient solutions, which you can do yourself. In this case, it is necessary to follow the simple instructions:
- Buy a LED strip with suitable brightness and light spectrum. It is better to choose not multi-color RGB-variants, and monochrome, which come in two types - with warm and cool lighting. They burn much brighter and provide high quality light, while multicolored ones do not give a perfect spectrum even at maximum settings. The tape is sold by the meter, which is very convenient.
- Calculate the required intensity of lighting. Based on this, you can find out how many LEDs will be needed for lighting. If the aquarium is small, you can simply fix them around the perimeter of the top cover. And if the container is larger, you will need several rows, it all depends on the result of the calculations.
- Fix tape can be on a piece of glass or plywood, it is necessary to choose an element of suitable size as a base. The surface to improve the reflection of light can be covered with paper or simply painted white. Consider the arrangement of the ribbon: it should be spaced equidistantly for even lighting. Cut only in the designated areas, connect with a connector or soldering. Mounting is easy - from the back side you need to remove the protective layer and press the tape to the surface.
- Bring out the wire to which the power supply and dimmer are connected to adjust the brightness. Carry out all work carefully, solder the connections well and cover them with heat shrink tubing to protect against oxidation and damage.
- Check the operation. It is easy to adjust the brightness, and if the light turned out to be too powerful, you can turn off 1-2 strips to reduce the intensity. To increase the illumination is suitable for sticking foil on the surface on both sides of the strip.

In aquariums, it is necessary to use a waterproof LED strip, which is labeled IP68. It is encased in silicone and will not fail even if dropped into water.
Making an LED light fixture
To make lighting with DIP type diodes or tape, you will need a wire, a soldering iron, a blank made of plastic pipe. Can be used and improvised materials. The work is done as follows:
- If you have an old gas tube light in the cover, you can adapt an LED light to it. To do this, find a piece of polypropylene pipe with a diameter slightly smaller than the lamp. The length should be such that it can be inserted tightly into the lamp without additional fastening.
- Tape a suitable wattage neatly wound onto the tube in a spiral, removing the protective film and gluing it to the surface. At the end connect the wire with a connector or soldering iron and check the operation. In this case it is necessary to put a dimmer, because to guess with the brightness is difficult, and at the expense of the reflector in the lamp, the light will be distributed throughout the aquarium, not scattering to the sides.

If there is no lamp, you can make it yourself. To do this, the plastic tube must be cut lengthwise to get two halves. LEDs for the aquarium will be attached inside, and the bend will serve as a reflector. It can be painted white or glued foil with double-sided tape. The work should be carried out as follows:
- Choose DIP LEDs for the aquarium with long legs, so that it is convenient to work. Calculate the quantity according to the required power. Drill two small holes in the tube for each LED, the spacing should be determined in advance to fit all the elements in the blanks.
- Put the LEDs through the holes, then solder the wire to connect the system. It is better to use a parallel connection so that if one diode burns out, the others will work. Take out a wire to connect the power supply and a dimmer.
- Fix the lamps in any convenient way, the main thing is that they are well fixed on the cover or frame and do not fall into the water. Check the work, adjust the brightness so that the lighting was suitable for the aquarium.
So you can make a light and LED strip, the advantage of this option in the curved reflective surface, directing the light down.
For the aquarium, LED lights and ribbons are best suited, as not afraid of water, not warm during long hours and consumes the least amount of electricity. You can buy ready-made models, but they are not difficult to do and their own, if you calculate the necessary characteristics of light and choose the option with the optimal brightness and spectrum.
At the end of the video: Making a light for the aquarium from LED strips