Apartment lighting wiring diagram - purpose and choice
Connecting lighting in a modern apartment has become much more complicated. If previously the only source of light was a chandelier, now rooms are equipped with additional lamps, separate zones, and decorative lighting. In addition, a lot of equipment is now connected, which further complicates the system. But the principles of wiring remain the same, if you understand them, you can cope with the work yourself.
Features of modern electrical wiring
Technology is developing rapidly and over the past decade they have made a qualitative leap, which is reflected in the wiring. In addition, security requirements these days have become much stricter, which is reflected in the choice of equipment and cable, you can not save on this. Also, there are several other aspects to consider:
- An approximate load is calculated before buying the wire. It should be taken with a reserve, so that when you connect additional equipment there will not be overloads.
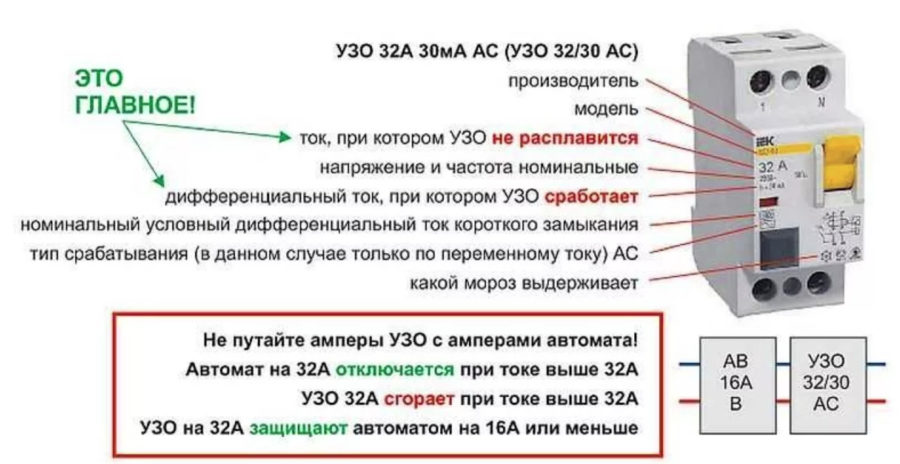
- RCDs, circuit breakers and other elements that ensure safety should be selected. Be sure to do grounding, without this electronics can simply burn during an ordinary thunderstorm.
![Wiring diagram for apartment lighting - purpose and choice]() Circuit breaker (RCD)
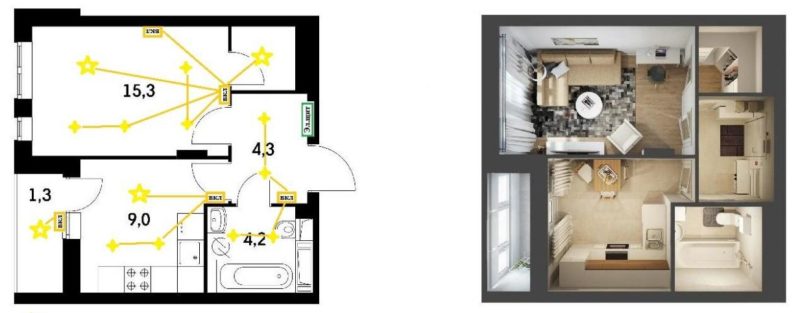
Circuit breaker (RCD) - It is necessary to think about the location and number of light sources, as well as outlets and switches.
![Wiring diagram for apartment lighting - assignment and selection]() The more light sources in the room, the more complicated the wiring scheme.
The more light sources in the room, the more complicated the wiring scheme. - Most often, several modes of lighting are used to create comfortable conditions for rest or work.
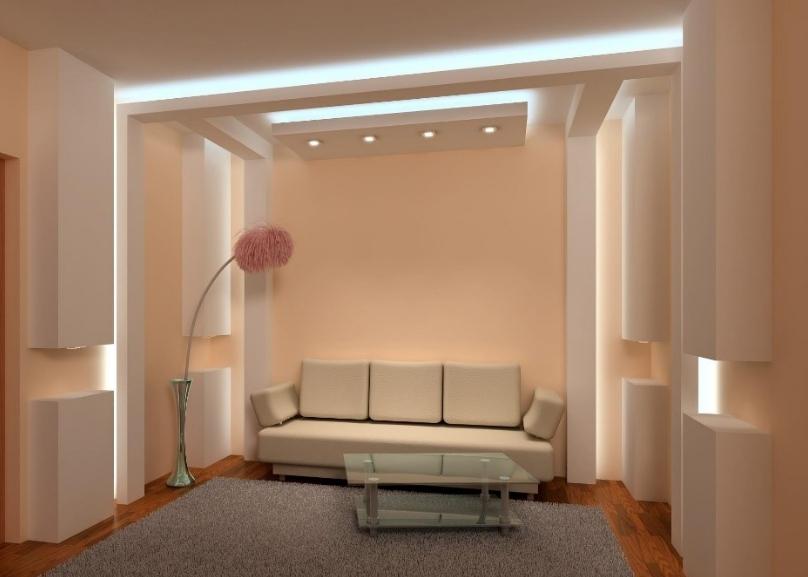
By the way! It is worth installing dimmers - nodes for adjusting the brightness of the light.
Why you need a wiring diagram
Without a clear plan of wiring through the apartment does not work any professional. When the installation is carried out independently, the importance of the project increases even more. If everything is done correctly from the beginning, then you do not have to spoil the finish to run additional wires or connect extension cords that will be lying around underfoot. There are a few recommendations to follow:
- All the features of the operation of each room are thought out in advance. Only after this you can begin to make a project.
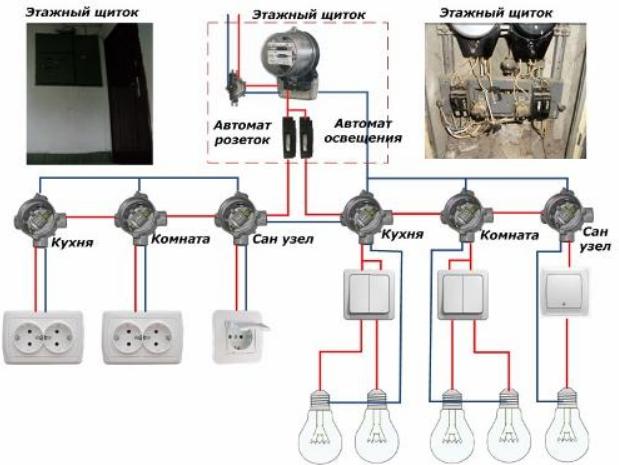
- The central element is the distribution board, from it diverges all the wiring.
![Wiring diagram for apartments lighting - assignment and selection]() Designing begins with a switchboard.
Designing begins with a switchboard. - For safety are responsible for automatic circuit breakers of appropriate capacity, the number is calculated separately for each apartment.
- From the circuit breakers are laid cables with an appropriate cross section. They are selected with a reserve to avoid overloads and overheating.
- All branches are made in special junction boxes. Their location must also be marked.
- Reliable and safe switches and sockets are selected. The type of lighting, the amount and approximate location of the equipment in each room are determined.

It is better to entrust the drafting of the project to professionals. Then it will be made in accordance with safety requirements.
Wiring groups
To simplify troubleshooting and ensure the reliability of the system, the wiring diagram is divided into 4 main groups. This is also convenient by the fact that in case of a problem in any part, it is not necessary to completely de-energize the apartment, it is enough to turn off one automatic circuit breaker.

Stationary equipment
This includes appliances that consume a lot of electricity when in operation. Most often it is a washing machine and dishwasher, water heater, etc. It is better if all such equipment is powered by a separate cable with a large cross section. This will prevent overloading and protect the rest of the network from damage.
Usually, this line is connected to the bathroom or bathroom and kitchen. But there are no restrictions, you can lay it wherever it is necessary. It is especially important to make a separate line if the equipment is connected directly to the wire or the socket is in a hard-to-reach place. Then, in case of breakdowns, you can quickly cut off the power supply.
Kitchen
Here, too, most often lead a separate line, despite the fact that there is a reliable cable for stationary equipment. The peculiarity of the room is that it can simultaneously operate several consumers of electricity. For example, a mixer, a multicooker, a kettle, etc.
That is, the load on this part of the wiring is uneven and varies greatly. In addition, it is important to think about the correct location of outlets, so that they are everywhere you need them. At the same time, it is necessary to comply with safety standards and do not place the wiring close to the stove, and outlets and switches next to the sink.


Residential lighting and power supply
The number of lines depends on the load on the wiring and the number of lighting equipment used in each room. You can combine two rooms if there is one chandelier and several outlets.
If you use a chandelier, spot lights and backlights, it is better to divide the rooms to distribute the load evenly between them. Even if the power of the equipment is small, but there are many connection points, you should not combine the rooms, as it will greatly complicate the scheme.
Rooms with high humidity
In an apartment is most often a bathroom and toilet. Since the operating conditions in these rooms are difficult, it is necessary to allocate a separate line for them and comply with such advice:
- Distribution boxes are placed outside wet rooms. A cable is inserted inside the bathtub that is not interrupted as far as the connection to the light fixture or socket.
- Switches should be chosen with a degree of protection against moisture IP44 or higher. Socket outlets should be chosen with splash protection to avoid any problems.
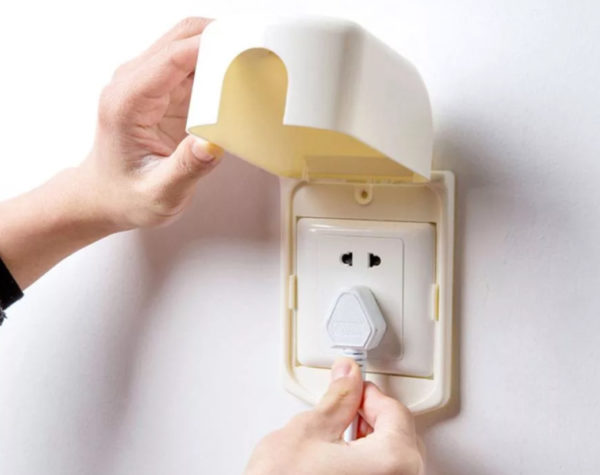
![Wiring diagram for apartments lighting - assignment and selection]() You can use a plastic protective housing.
You can use a plastic protective housing. - In the bathroom and toilet wiring should be three-wire, with a grounding wire.

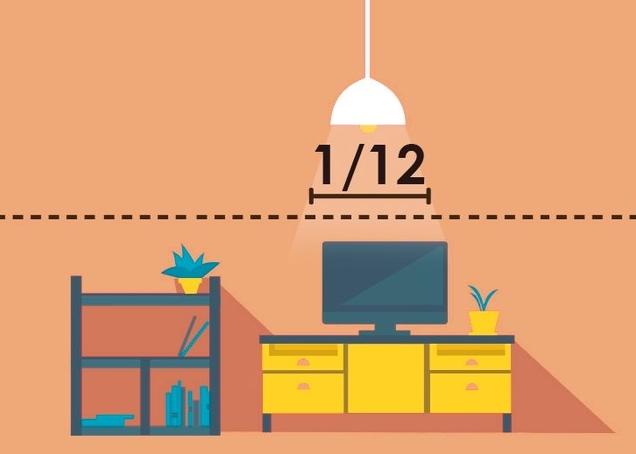
It is better to install 12 volt lights in the bathroom and toilet, they are completely safe.

Wiring your own hands: from the scheme to installation
Distribution of light in the apartment consists of several stages. Each of them is important and any violations can bring a lot of problems and create a danger to the tenants. Therefore, it is necessary to understand all the features of the process to organize everything correctly and avoid mistakes.
Basic rules
Before you design a system, you should study the rules and adhere to them when laying wiring and installing fixtures and outlets. They are all prescribed in SNiP and other regulatory documents. In case of violations, you will have to redo the work, so it is easier to initially do everything correctly. It is necessary to remember the following:
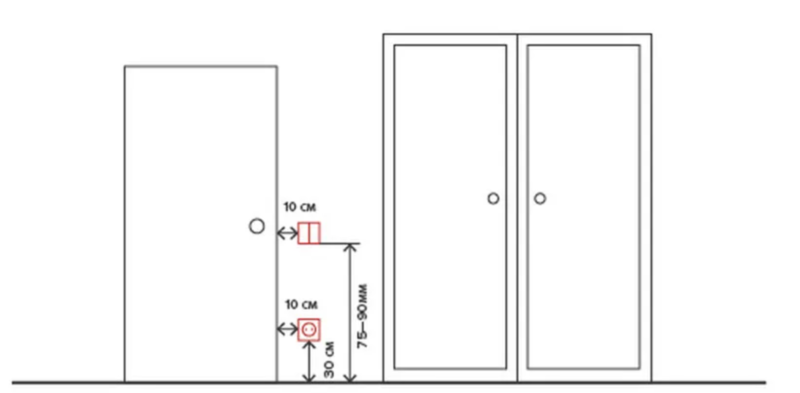
- Outlets are located at a height 50 to 80 cm from the floor. This ensures ease of use and prevents water from getting on the contacts in case of flooding of the apartment. The minimum distance from heating pipes and radiators, electric and gas stoves and other grounded elements is 50 cm. The wire to the outlets should run from the bottom to the top.
- The height of switches is usually 60 to 150 cm. Arrange them so that it was convenient to turn on at the entrance to the room. Wiring in this case should be led from the top down.
![Wiring diagram for apartment lighting - assignment and selection]() Recommended standards for doorways.
Recommended standards for doorways. - The norm is one socket per area 6 square meters. For the kitchen, the number is determined individually, it all depends on the number of appliances used. Putting outlets in the toilet is not allowed, for the bathroom use waterproof versions, which are connected through a transformer.
- All important elements of the system must be located in places with easy access. Do not cover with trim junction boxes.
- The wire is laid only vertically or horizontally. Do not cut corners, this will make it difficult to locate the cable later.
![Wiring diagram for apartments lighting - purpose and choice]() Cable routing should be marked on the project, this will prevent damage to electrical wiring when installing pictures and shelves.
Cable routing should be marked on the project, this will prevent damage to electrical wiring when installing pictures and shelves. - Wire insulation, regardless of the method of laying, must not come into contact with metal elements of the structure.
- When laying, certain distances must be respected. For horizontal lines, the minimum distance to the ceiling is 15 cmFor horizontal lines, the minimum distance to the ceiling is 15 cm, to beams and cornices 5 to 10 cmfrom the floor should be at least 15 cm. In the case of vertical laying from a window or doorway is indented from 10 cm, if in the room are gas pipes, the minimum distance to them is 40 cm.
![Wiring diagram for apartment lighting - assignment and selection]() When drawing up a project, you must take into account the requirements for laying cables and other elements.
When drawing up a project, you must take into account the requirements for laying cables and other elements. - When laying multiple cables, there should be at least 3 mm distance between them if they are fixed without protective corrugation.

Do not connect copper and aluminum conductors together.

Lighting calculation
For each room there are lighting norms, which should be adhered to before selecting fixtures. Everything is simple enough, the main thing - remember that this is the lower limit, it is better to make the light brighter and use several modes. Focus should be on such indicators:
- Living rooms and kitchens - from 150 Lux per square meter.
- Children's rooms - from 200 Lk.
- Libraries and offices - from 300 suites.
- Entrances, bathrooms, storage rooms, bathrooms - from 75 lux.
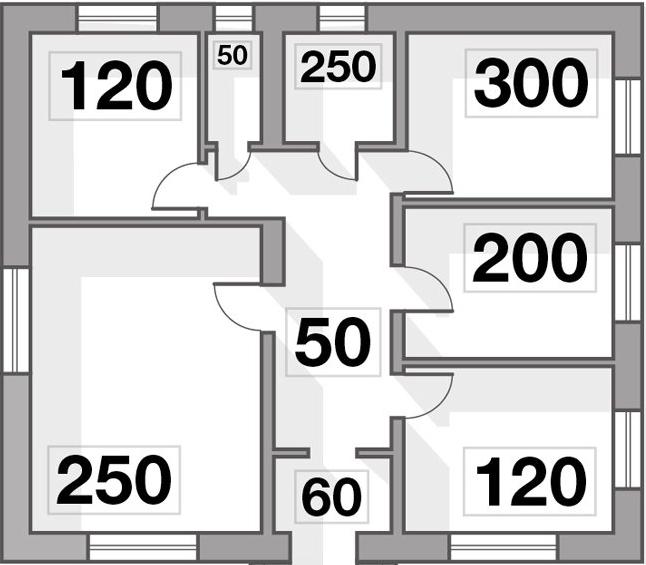
To determine the power of the luminaires you should multiply the norm by the area in square meters. The result will be a reference point. It should be divided by the number of light sources to determine the characteristics based on the location and number.
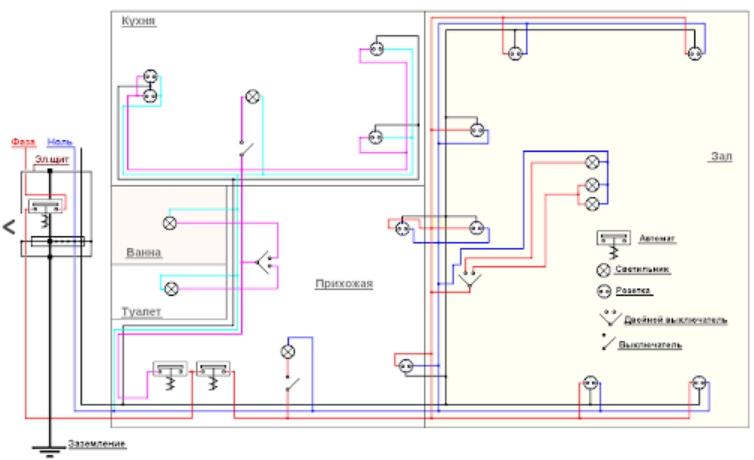
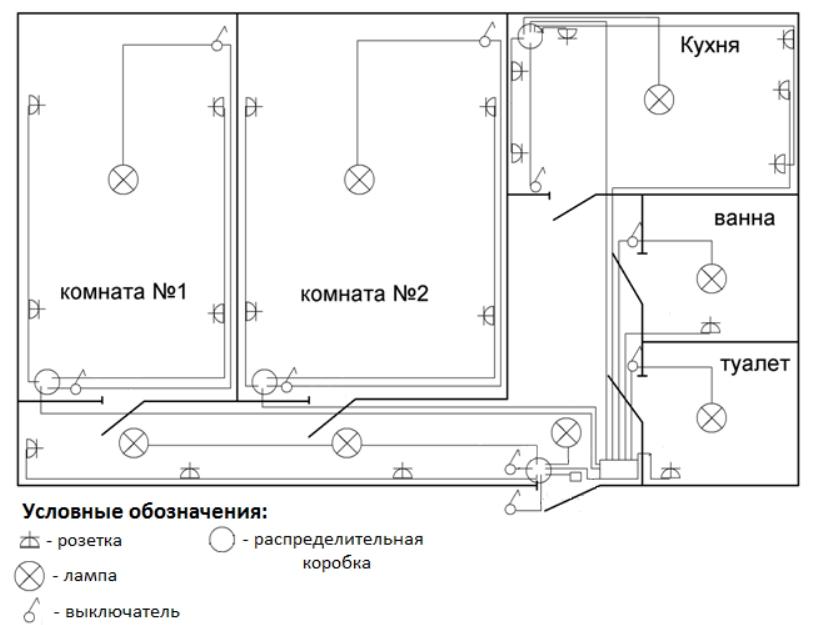
Wiring diagram
The project is prepared in advance to carry out the work strictly according to it. Here everything depends on the characteristics of the apartment, the number of rooms, used lighting and other equipment. Below are a few typical schemes that can be taken as a basis.

Layout of wiring and preparatory work
A ready-made project is used as a manual, which simplifies the work. Here it is important to adhere to simple rules:
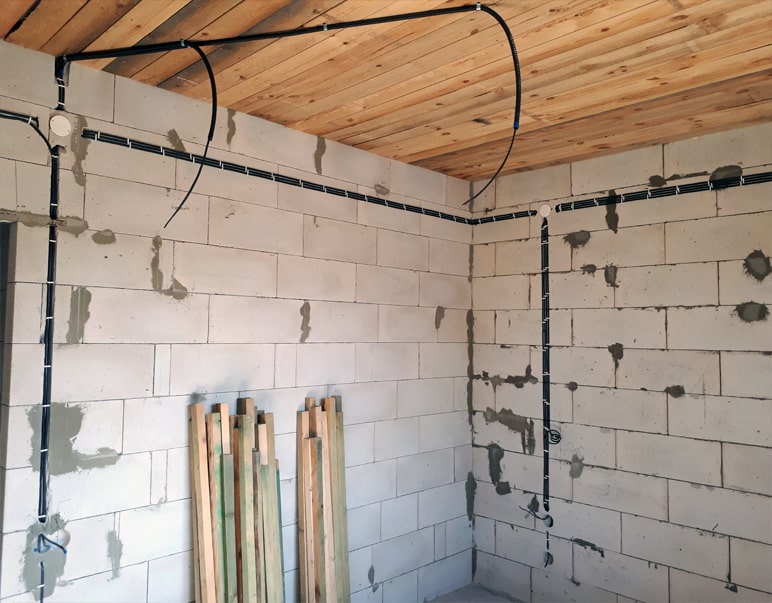
- On the walls, lines are drawn where the wires will be laid. They are made according to the rules described above.
- For sockets and switches, holes are made with a special drill. Detailed connection of switches is described in this article ..
- Under the wiring it is necessary to knock out strokes with a perforator or cut with a grinder. The places of cable passage through the walls are drilled with a drill of suitable diameter.
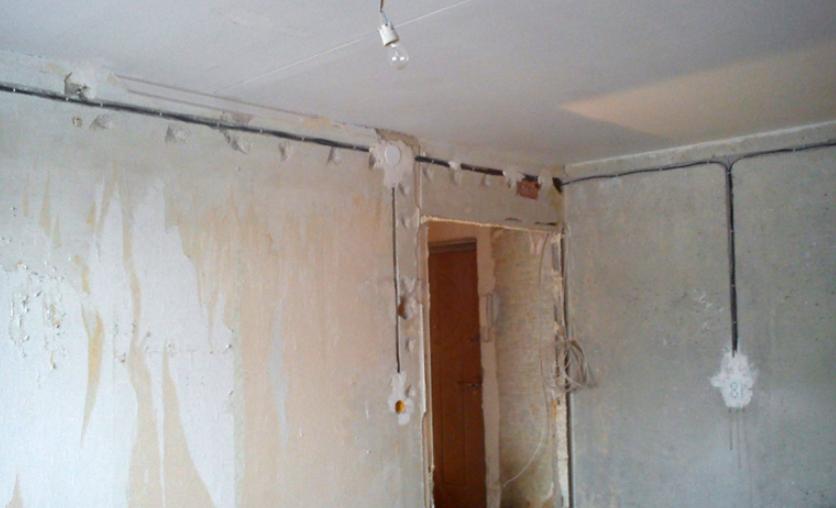
The work is simple, but there will be a lot of dust, it is difficult to break through the strokes in the concrete.
Installing the wiring
After preparing the surfaces, you can proceed to the installation and connection of all elements. The technology depends on how the cable is laid:
- If an open version is used, the wire is laid in special cable channels or use wall mounts, on which the cable in a fabric braid is screwed. It is important to position all elements correctly, connections make only in junction boxes, wires are joined by soldering or special terminals.
- Hidden wiring lay in the tunnel, carefully fixing the wires with special holders. All connections must be in junction boxes, you can not make them in the walls. You can level the surface only after the completion of electrical work and testing of the system.
The video talks about the general scheme of home electrical wiring.
Choosing the right scheme will ensure a comfortable and safe electrical supply of the apartment. It is especially important to think through the lighting, as it may consist of several elements and each must be connected separately.