Features of RGB LED strip connection
In recent years, LED lights made in the form of ribbons have become popular. A variety of such a lamp is RGB-ribbon, which allows you to change the color of the glow in static and dynamic modes.
The principle of operation of RGB-lighting
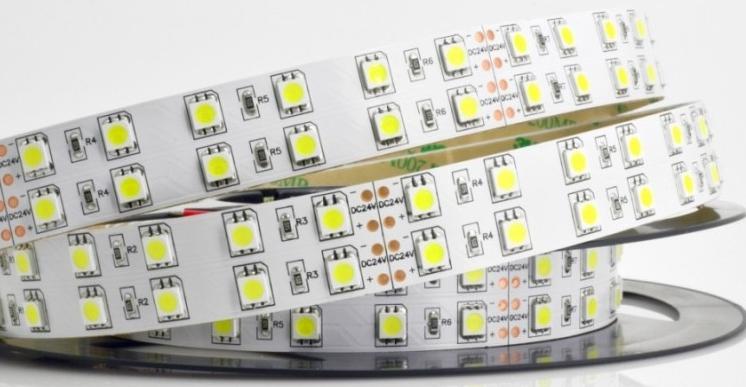
To approach the question of connection with knowledge, it is necessary to understand how this lighting device is arranged and how to control it. The ribbon consists of individual segments into which it can be cut in specified places.

Each segment contains three groups LEDs - red, blue and green. They are assembled in series by color and connected in parallel in a circuit with a common anode. Each color has its own current-limiting resistor. Positive voltage is always present. LEDs are lit by connecting the cathode to a common wire. By separately adjusting the brightness of each LED, almost any color can be achieved, with the exception of natural white.
To obtain a white glow that is close to natural, one white LED is added to each element of the tape. Such a device is denoted by the letters RGBW.
What is needed to connect the strip
To connect an RGB LED strip circuit will need blocks:
- The actual lighting fixture of the desired length;
- Power supply (possibly several);
- RGB controller;
- amplifier (several);
- connecting wires;
- power switch;
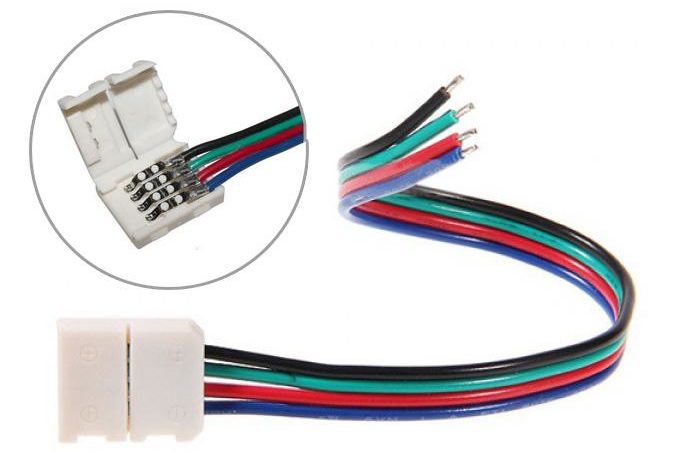
- connectors (but it is better to master soldering).
This list is complete, some elements may not be present in a particular circuit.
Of the tools you will need:
- wire cutters for cutting wires to the right length;
- a box cutter for stripping the ends (or better - a special stripper of the insulation;
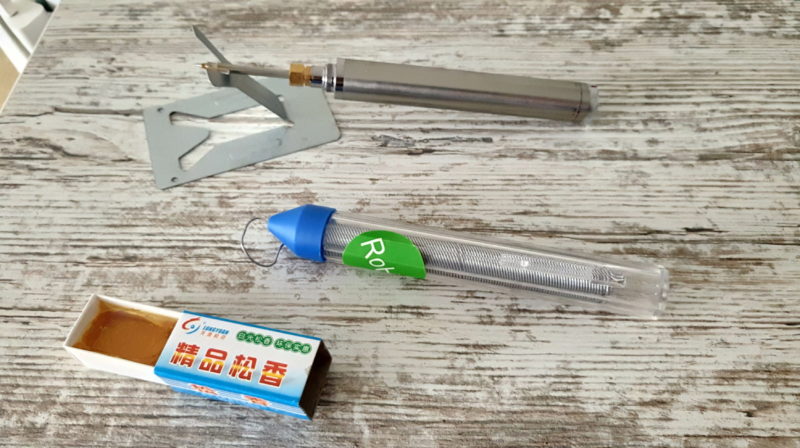
- a soldering iron with consumables (for real craftsmen).
You will also need fixing elements, but they are selected on the spot.
Which controller to choose
The controller is needed to control the colors of the LED strip. It allows you to set the necessary proportions of red, green and blue and get almost any color, including conventionally white. You can also control the dynamics of transition from one color to another. Regulation is done by PWM method, so power loss when changing brightness is low. According to the consumer properties, most of the colored dimmers can be divided into categories:
- Remotely controlled. Mode selection is made from the remote control (similar to television or other household equipment). Communication between the remote control and the controller may be via infrared or radio (such units are labeled RF). In the first case, when installing it is necessary to ensure direct visibility between the transmitting and receiving part. In the second case there are no such restrictions. You can control the glow even in the next room or hide the receiving and executing part behind the interior elements.
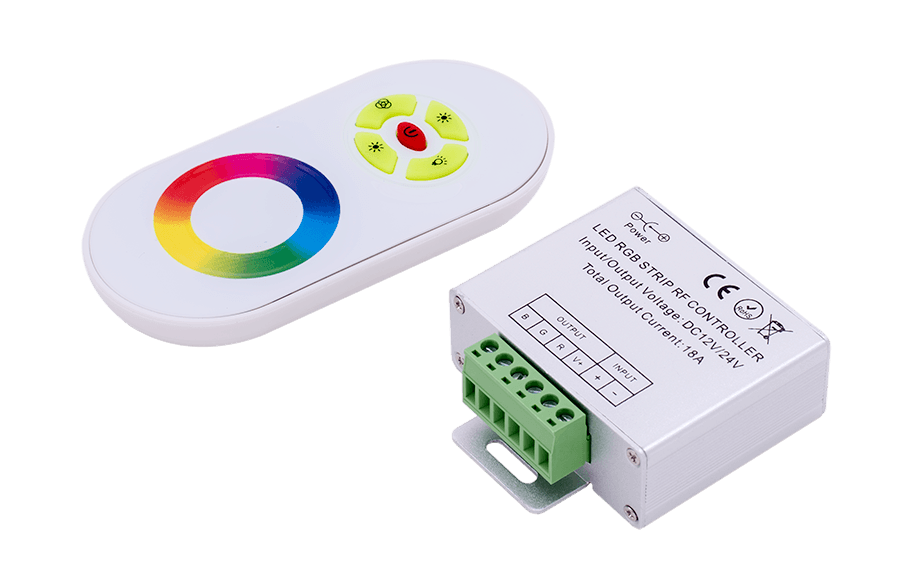
![RF-controller for 12/24 V and current up to 18 A.]() RF controller for 12/24V and up to 18A.
RF controller for 12/24V and up to 18A. - Built into sub-sockets or into furniture elements. Such a controller looks like a futuristic light switch. You can set modes of operation, just like with a remote control.
![Built-in control unit.]() Built-in control unit.
Built-in control unit. - Controller, controlled by a personal computer. Possibilities of creating light effects are unlimited. But you need to have a PC on hand.

The choice of the control unit in terms of electrical parameters is made according to two main characteristics:
- operating voltage - must match the voltage of the tape and the power supply;
- maximum power - it must correspond to the total power of the tape to be connected.
If it is required to regulate the brightness very long (and therefore very powerful) luminaire, which cannot be handled by any industrial controller, you will need an amplifier.
Is it possible to do without a controller
The controller is not a fundamental element, without which the RGB luminaire will not work. It is possible to connect RGB strip without it by turning on all elements of the luminaire at full brightness all the time.

In this option, the luminaire will emit light close to white. From an economic point of view this does not make sense - tape with white emission color is much cheaper. Another option is to connect a colored strip for separate manual adjustment of the channels. This can be done using potentiometers or other way.

In this variant, the brightness of the channels can be adjusted separately, setting the desired glow color, but some power is uselessly lost on the variable resistors. Instead of potentiometers, you can put separate switches and mix colors at full brightness.
You can look for other ways to adjust the current in manual mode, but all these methods allow only a static picture. Dynamic lighting effects are possible only with RGB controller.
You can also connect a monochrome light to the controller for the appropriate voltage and power. It is connected to one of the outputs of the control unit and works in dimming mode.
When you can not do without the amplifier
If the capacity of the controller is exhausted, and you need to increase the length of the leaf light, you can use an amplifier - in foreign terminology "RGB-signal repeater". And in fact, the voltage it repeats the signal applied to the input, but amplifies it in terms of current. The amplifier is selected according to several parameters:
- The voltage must match the voltage of the controller (respectively, the voltage of the power supply and the luminaire);
- the power must have enough power to supply the intended section of the strip;
- number of channels - at least three for RGB-lighting;
- design - in most cases with a common anode, but it does not hurt to check.
You can also pay attention to other parameters - operating temperature range, degree of protection, etc. This is mostly necessary if you intend to install the repeater in difficult conditions (outdoors, etc.).
Wiring options for color ribbon
Connection scheme variant is determined only by the total power consumption of the LED strip, which depends on:
- specific consumption of one meter of the strip;
- Total meterage of the luminaire.
The more the luminaire consumes, the more complex the scheme.
Important! Variants of circuits are given depending on the meter strip, but the actual consumption should be verified each time by the technical characteristics of a particular RGB-luminaire.
Standard scheme
According to this scheme it is possible to connect the luminaire if the total length of the web or the sum of its segments is not more than 5 meters.

The only task is to select the power supply and control unit of the required voltage and power. Usually it is not difficult.
Schematic of the power supply of an extended RGB-ribbon
If the length of the strip is more than 5 meters, then in series connect the segments it is impossible to connect the segments in series. There will be too much current through the lamp conductors, and they are not designed for it. Therefore, it is necessary to connect pieces of tape no longer than 5 meters in parallel, to connect with connectors, or better - by soldering sections of wires.

In this case, pick up the power supply and the controller of the required power is also not difficult.
Diagram of connection of long webs
If the total length of the web segments does not allow you to choose a suitable power controller (or even a power supply for the appropriate current), you will have to use RGB signal amplifiers (one or more) to increase the system. For example, it is necessary to connect a strip with a length of 20 m or more. All ribbons are divided into groups so that power of each group does not exceed the capacity of the controller and amplifier.

You can build up the system in theory to infinity. If the voltage source alone can provide power to all components of the circuit, and everything is located close enough not to have the inconvenience of laying the power cable, then additional power supplies will not be needed.
How to avoid mistakes
The most common mistake even for experienced electricians trying to connect the remote control to the LED strip is exceeding the capacity of the power supply, controller or amplifier. This happens when the circuit is assembled "on the edge", and it seems that the power supply will provide current, albeit with no reserve. As a result, the life of an expensive device turns out to be very short.
Another underestimate is the lack of wire cross-section. A powerful consumer is connected with wires that are too thin or too long. The first case leads to overheating, the second - to a voltage drop on the supply line and a dim glow of the luminaire.
| Cross-section of copper wire, mm | 0,5 | 0,75 | 1 | 1,5 | 2 |
| Maximum allowable current in an exposed conductor, A | 11 | 15 | 17 | 23 | 26 |
You should also pay attention to the correct pinout of the RGB luminaire. If you connect the wires not in accordance with the colors, you can get a mishap, when different groups of LEDs burn in different sections of the cloth. This happens more often when using soldering to connect the segments of the strip.
At the end of the video: Instructions for connecting the LED strip to the infrared controller with remote control.
Other mistakes can be a consequence of inattention and carelessness during installation. Immediately after completing the work it is necessary to check the correctness and reliability of the connections. If this is done before the first voltage is applied, then the RGB light will last a long time.