Features of installation and connection of street lamps
Outdoor lighting on the site when the house in the village or cottage - it is not only aesthetics and comfort, it is also a matter of safety. Therefore, the issue of arrangement of territory lighting should be taken seriously - miscalculations in the planning can cost a lot, including in the literal sense.
Recommendations for lighting control
An important point is the choice of control scheme and connection of street lighting. The easiest thing to do is to make the lights controlled manually - switching on and off from the operator. But modern household electrical equipment allows even an average skilled craftsman to create schemes for the automatic control of lighting fixtures or create dynamic special effects.
All lighting fixtures should be combined into groups according to their functional purpose. For example, some devices should turn off automatically with the first rays of the sun. They are connected via photo relay .. Others should shine a little longer, they are connected through another light relay with a different triggering level. A third group of lights must be controlled manually only. They are connected through a normal switch. All this should be thought through at the design stage, before you buy the components and start the installation.

Each group of lights must have its own control circuit:
- Group circuit breaker and automatic circuit breaker of the lighting line must be. In addition to their protective function, they serve as switchgear to shut down the entire switchboard or a single line for repairs or other work.
- Three-position switch. It selects the type of control - manual or automatic, plus there is a "Disconnected" position. If you do not need manual mode, or there is no automatic circuit, you can not put. But for the future you can mount.
- Manual light switch. Allows you to control the lights in manual mode. It is useful and for the time of repair in case of failure of the circuit automatics.
- Photorelay. Turns on the lighting at dusk, turns it off at dawn. Gives considerable economy of electric power.
- Magnetic starter. It is needed to increase the load capacity of the photo relay. If the power of the light relay contacts is enough to switch the lighting load, you can not install it.
Instead of the photocell, you can install a controller that will control the lighting according to a predetermined program. It can be industrial or homemade (including those based on Arduino). In this case, the possibilities of light control are significantly expanded.
Choice of equipment and supplies
With a certain degree of convention all the lights are divided into:
- facade - illuminate the area directly adjacent to the house;
- suspended - hung on walls, posts and building structures;
- Mast - are installed on special supports, representing a single structure with the lamp;
- landscape - illuminate elements of landscape and architecture;
- marker - designate elements of the landscape, for example, paths.
Topical video: Selection of decorative streetlights.
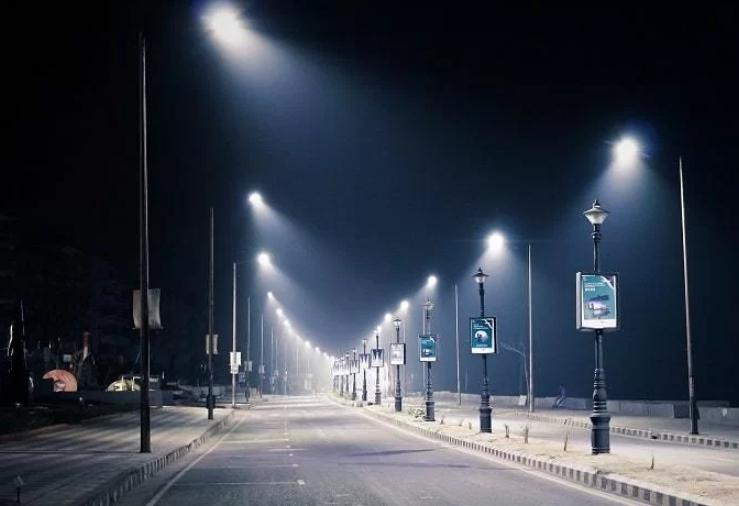
All lights, in addition to the direct function of creating a light flux, also have a decorative purpose. Therefore, the choice of the device - always a task for the owner, and here his imagination is limited only by the execution of lighting devices by degree of protection according to GOST 14254-2015.
For the organization of electrical lines that power the lights, it is necessary to use only copper conductor products. Although now there is a trend towards widespread acceptance of aluminum conductors, but from a technical point of view, copper has only advantages, although it loses out in economics. The cross-section of conductors for lighting networks depends on the load, but in most cases 1.5 mm² is sufficient to provide current carrying capacity. You should also take into account that the lights may be located at a considerable distance from the switchboard, so you should make an additional check for voltage losses. The voltage drop in the line depends on:
- the cross-section (the larger it is, the lower the losses);
- the material of the core (copper has a lower resistivity than aluminum - the losses will be less);
- the length of the line.
The easiest way to check is to use an online calculator. The voltage at the furthest light fixture should not be lower than the original voltage by more than 5%. If this condition is not met, you must increase cable or wire by one step and repeat the calculation.
No less important is the question of choosing the method of laying the supply conductor products. And here the aesthetic function comes to the fore. For these reasons, the open method is rejected at once. The exception is small sections of wiring performed by hanging method, when this cannot be done without. For example, laying from facade to facade. And such installation is carried out at a height of at least three meters. It is convenient to use insulated wire with a carrying cable (CIP) for this purpose. Such a wire does not require additional supporting structure, which must be used in the case of cable suspension. First, a metal rope is stretched, and then the cable is attached to it along its entire length. But the most aesthetic is considered underground laying of electrical lines. For this most suitable cable with an armored jacket, but it is expensive. Therefore, most often used to lay ordinary cable (eg, VVG) in pipes.
Stage by stage (installation and connection)
Begin the work on the organization of site lighting should begin with the drawing on the plan of the location of lighting fixtures. To choose the number of lighting fixtures you can use SNiP (or more modern SP - updated SNiP). They are not required for home use, but studying them will help orient the minimum required number of lighting fixtures.
| Territory | Main and auxiliary entrances to parks, sanatoriums, exhibitions and stadiums | Sidewalks, entrances, walkways and central avenues | Sidewalks and auxiliary entrances to parks | Open parking lots on streets of all categories, driveways between rows of box-type garages |
| Minimal illumination, lux | 6 | 4 | 1 | 6 |
Norms of illumination of public areas can be compared with parts of private estates that have approximately the same function and to convert lux into lumens. To do this, the illumination in lux should be divided by the area of the illuminated area in square meters. You get the minimum required light flux, which should pick up the power of lighting fixtures and their number.
As the installation of cables or self-supporting wires in such cases is unacceptable for aesthetic reasons, in 99% of cases the underground installation of lines is chosen. Therefore, future trenches must also be marked on the plan. As long as everything is on paper, the project is easy to optimize and minimize in terms of the amount of work. Once excavation begins, it will be more difficult to do so.

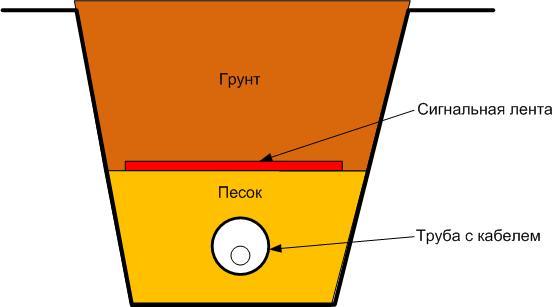
According to this plan, it is necessary to dig trenches 70 cm deep from the switchboard, and in the places where the lights are installed on the ground - holes a little larger than the base. In the trenches must be arranged sand cushion thickness of 100 mm.

After that it is necessary to lay the cable (if the variant with armored shell is chosen) or plastic pipes with a diameter of 22 mm to protect the lines from damage. In places of future installation of light sources, the pipe is brought to the surface, then again goes into the ground to the next lamp. By this point it should be clear how the luminaires are grouped.

Important! It is desirable to provide in several places the exit of the cable from the ground for the installation of outlets.
Depending on the scheme each place of installation may have two or three pipe outlets. For each group of illuminators a different "pipe" is used.

After using a rope in the pipe tightened sections of cable with a reserve of 30-40 cm at the output for future connection.

Then you can fill up the pipe with a layer of sand 100...150 mm and bury it. It is very useful on top of the sand cushion to put a signal tape. When excavating in the future it will warn that the cable line runs deeper.

You should end up with a "sandwich" like this:
The next step is Installing the street lights. It is carried out according to the design of the device and the manufacturer's instructions:
- Some light fixtures require concrete foundations to be built and poured;
- Others have a footing that requires only gravel backfill for drainage;
- For suspended lights, nothing is needed.

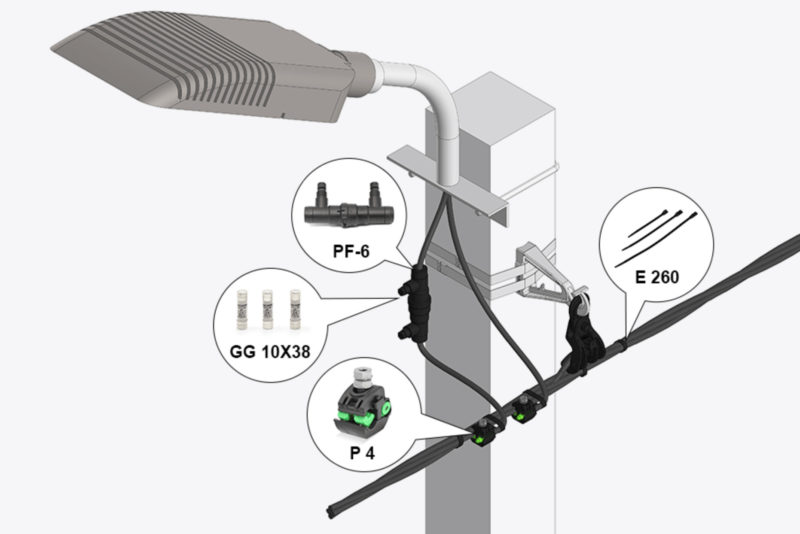
After that, you can perform the connection of the conductors of the cable in the distribution boxes. It is convenient to use Vago or similar terminals for this purpose. To protect the installation, it is desirable to fill it with a special epoxy compound.
Important! After installation is complete and the compound is fully cured (but before you connect the lamps and the power supply side) you should measure the insulation resistance with a megohmmeter at 1000 V. Riz should not be less than 1 megohm.

The last step is the connection of street lights, their final assembly, the connection of the supply side of the cable to the switchboard. After that, you can apply voltage, try out the switching scheme, set up the automation and, finally, enjoy quality lighting.