How to correctly resolder LED
Light bulbs with LEDs consume less energy than incandescent bulbs. They also last much longer, so homeowners and apartment owners are gradually switching to economical lighting. But despite its long life, LED bulbs can gradually fail due to the burnout of the LEDs installed inside.
When one of the chips deteriorates, it is not a reason to throw away the bulb, it can be fix. You will need a tester to determine the breakage, then you can replace the damaged element or connect the circuit. In the latter case, the repair will have a negative impact on the life of the lamp, it will become dimmer. Therefore, it is better to replace the chip with another one. To do this, you need to know how to solder LEDs.
How are diode elements arranged?
LED lamps have diodes inside them. They are also mounted in the lines and ribbons, which are often used in advertising banners. There are no pins. Diodes are mounted on a plastic or aluminum printed tape and are connected to each other by a special track during soldering. Remove the LED or install a new one is not difficult if you have a gas torch soldering iron and flux.

In most cases, LED bulbs are made of aluminum, which can provide effective heat dissipation to the heat sink. A different number of LEDs are installed inside, which determines the power. Contact pins of the LED strip has a substrate on the back side to dissipate heat. It is soldered to the heat sink pad. Removing one of the diodes, it will also have to be unsoldered.
Keeping it safe
In the process of repairing any device that is powered from the mains, it is necessary to observe safety precautions. LED light fixtures, like incandescent bulbs, are connected to 220 volts. Therefore, the technician must be careful and take into account the recommendations:
- After turning off the lamp, it is necessary to manually discharge the capacitors. To do this, the leads are shorted with a metal device with a dielectric handle.
- Do not leave the soldering station unattended during the soldering process, it can provoke a fire;
- including the installed bulb, it is better to turn away, as there is a chance that it will explode due to possible mistakes.
Soldering LEDs is not an easy process for a beginner. To repair should proceed only if you have experience with a soldering iron, are familiar with the design and operation of the chips.
How to unsolder and re-solder the LED
Before you start soldering, you should study the instructions and get materials and tools for work. Do not forget about checking the purchased LEDs. Sometimes masters neglect this rule, because of which the work has to be done twice.
What is needed for work
To unsolder a LED from an aluminum board, you need:
- tweezers;
- blade;
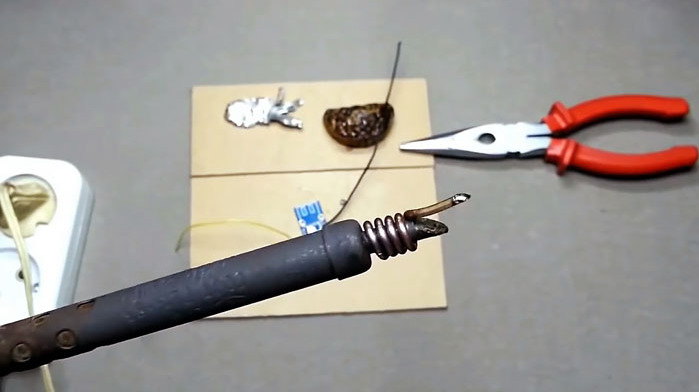
- A soldering iron (a fine-edged soldering iron is recommended);
- flux;
- holder.
If you don't have a soldering iron with a thin blade, you can make a nozzle out of copper wire.
Soldering temperature
The indicator diode, which is mounted on the circuit board, consists of conductive legs and a glass bulb. It looks like a small light bulb. A soldering iron with a maximum power of 60W should be used for soldering.. The allowable temperature of the tip is 260 degrees. SMD diodes have no current-carrying elements. They are replaced by special pads on the board. In this case a 12 watt soldering iron is used for soldering.
Desoldering step by step instruction
The first step is to remove the aluminum board. To do this, the lamp housing is separated from the plafond. Here you can use a knife, carefully so as not to damage the elements. The board is attached to the base with a pair of wires (plus and minus). They should be unsoldered by securing the board to the holder. The board can be removed from the aluminum base without tools.

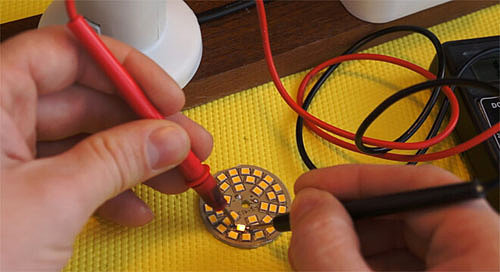
Before you start to unsolder the LED, you need to take a tester and go through all the chips to check their functionality. In most cases, damaged elements can be noticed visually. A black dot appears on the burned LED.

It is better to check with a tester, because sometimes the breakage does not entail visible changes.
Particular attention should be paid to the quality of soldering. If a defect was committed at the manufacture, it will affect the functionality of the chips.
Soldering diagram
When all the burned diodes will be identified, you can proceed to soldering. The board is fixed on the holder. After the torch is carefully brought to the back side of the board. After 3 to 5 seconds the solder should loosen, making it possible to disconnect the diode. A serviceable element must be secured before the base cools down.. To do this, a drop of flux must be placed on the contact pad. The chip is placed on top, taking into account the polarity.
Then the chip is heated again, with a slight pressure on the crystal. The diode is held until the contact "legs" are firmly fixed in the solder. If there is no LED, you can solder a small piece of wire in its place. The lamp will continue to work, but the light will be dimmer. This will only work if you have more than 10 chips on the board.

Diodes from "corn" lamps are unsoldered according to the same scheme. It can be done if the bulb small size and assembled according to the classic scheme. A hair dryer is sometimes used instead of a soldering iron, but it takes more time to work.
Before soldering the chips, the ruler should be secured to prevent damage to the current-carrying paths. The tin is melted with the soldering iron, with the blade moving simultaneously between the board and the lead. When all pins are free, the substrate is disconnected from the board.
Video example: Replacing LEDs in a lamp with an iron.
Common mistakes when soldering
Inexperienced craftsmen often make the following mistakes:
- Installing the connector on the current-carrying contacts. This will result in a bad connection;
- Using a soldering iron heated to 300°C or higher. This will cause the conductive strands to burn;
- Use of corrosive solutions will corrode the contacts;
- polarity mismatch when installing the diode on the board.
To ensure that the new diode works for a long time and does not burn out, before installing it on the board, remove the remains of solder from it. It is recommended to use a wire braid from a shielded wire for this purpose. Mistakes made in the process can cause a lamp to burn out momentarily or explode when switched on.
